Google Optimize, formerly called Google Website Optimizer, is a freemium web analytics and testing tool by Google. It allows running some experiments that are aimed to help online marketers and webmasters to increase visitor conversion rates and overall visitor satisfaction.
The Google Optimize website is used to design experiments and open a WYSWIG editor for each version tested in the experiment. The free version allows running a few experiments at the same time and a user needs to upgrade to Google Optimize 360 to run more of them. There are also other limits including limited audience targeting options.
- How can I Optimize my Website For Google?
- Is Google Optimize Free?
- Is Google Optimize Any Good?
- What is Google Optimize?
- Can you use Google Optimize With WordPress?
- Does Google Optimize Work With Shopify?
- How do I Test Google Optimization?
- How Does Google Optimize Split Traffic?
- What can I Change in Google Optimize?
- What is Google Optimize Code?
- What is the Purpose of Google Tag Manager?
- How do you Use Google Analytics?
- What is AB Testing in SEO?
How can I Optimize my Website For Google?
After following the steps in this article, you’ll have Optimize installed on your site and be ready to create experiences.
Prerequisites
To use Optimize, you must have:
- Google Analytics installed on your website
- The Chrome web browser
Create your Optimize account and container
- Sign in to optimize.google.com.
- Click Create account.
- Enter an account name.
- Agree to the Optimize Terms of Service.
- Enter a container name.
- Click Create.
Link to Google Analytics
Google Analytics is the measurement platform for Optimize inferences so you must link your Optimize container to an Analytics property to use Google Optimize. You can link your Optimize container to one of the following:
- A Google Analytics 4 property
- A Universal Analytics property
Next steps
Now that you’ve created your Optimize account and linked it to Google Analytics, you’re ready to install Optimize on your website.
Is Google Optimize Free?
Optimize is now immediately available to everyone — for free. This is not a test: You can start using it today. A recent survey showed 45% of small and medium businesses don’t optimize their websites through A/B testing. The two most common reasons given were a “lack of employee resources” and “lack of knowledge to get started.”
Read Also: SEO Definition Marketing
If you’re part of that 45%, Optimize is a great choice for you. Optimize has many of the same features as Optimize 360. It’s just right for small and medium-sized businesses who need powerful testing, but don’t have the budget or team resources for an enterprise-level solution. Optimize is easy for anyone to set up.
Early users of Optimize have been happy with how easy it is to use. In fact, it’s built right on top of Analytics, so if you’re already an Analytics user you’ll add just a single line of code to get Optimize up and running. With just a few clicks more, you can start using your Analytics data to design experiments and improve the online experience for your users.
Easy to use
Worried about having to hire someone to run A/B tests on your site, or frustrated about not knowing how to do it yourself? Don’t be. The Optimize visual editor allows for WYSIWYG (what-you-see-is-what-you-get) editing so you can change just about anything on your site with a drag and a drop. And more advanced users will enjoy the ability to edit raw HTML or add JavaScript or CSS rules directly in the editor.
Is Google Optimize Any Good?
Google Optimize AB testing is free. Absolutely free. No hidden fees, no in-app purchases, all their functionality is up for grabs for anyone who has a Google account or is willing to create one.
And while being free, Google Optimize AB testing also offers a variety of conversion optimization tools, such as A/B tests, multivariate tests, redirect tests (also known as split URL tests), personalization for targeted visitors and even a premade COVID-19 banner so your users know what’s your take on the world pandemic.
Google Optimize is very easy to use. Literally, a child over 12 years of age can figure out how to set up an A/B test experiment in Google Optimize in less than 20 minutes. And that’s while knowing nothing about Conversion Rate Optimization.
Once you’ve inserted a link to the website you want to optimize with Google A/B testing and named your variants, you’ll be asked to download a free Google Chrome extension that allows you to edit your website in live mode.
By applying free Google Optimize Chrome Extention you can play around and change the colour, size, placement, opacity and other parameters of each element during your website testing without any code needed. For those who might need more customized options, Google Optimize does include a code editor along with a visual WYSIWYG editor you just saw.
Here’s another among Google Optimize advantages – Google Analytics native integration. A Google Optimize progress bar at the top of the page of your A/B testing process does two things – help you navigate your Google A/B testing much easier, and hint that you’ll need to link your Google Optimize account with Google Analytics at some point.
An outstanding Google Optimize advantage is the ability and ease with which you can analyze reports in greater depth using Google Analytics. Having data from both your optimization and analytics tools in one place allows you to obtain a broad, comprehensive perspective on the status of your business.
And while data in your reports does not update in real-time, and will take up to 24 hours to appear in your dashboards, with Google Optimize you receive a luxury of high-quality reports at absolutely no cost.
What is Google Optimize?
Optimize allows you to test variants of web pages and see how they perform against an objective that you specify. Optimize monitors the results of your experiment and tells you which variant is the leader. To get started:
- Set up Optimize.
- Deploy the Optimize snippet on your website.
- Create your first experiment.
By running experiments in Optimize, you can test new website designs, layouts and content with a subset of your visitors. Instead of relying on instinct and opinion to determine the best page or site design, you can run an experiment that tests alternate designs with real-world users and get results that are simple to read and understand.
Optimize uses the power of Analytics to measure your experiments and leverage your Analytics conversions as experiment objectives. What’s more, you can serve experiments to specific groups of users that you’ve defined as Audiences in Analytics.
Can you use Google Optimize With WordPress?
In order to install Google Optimize on your site, you’ll need to insert a small code snippet into your website header. If you’re a beginner, it can be a bit tricky.
Thankfully, MonsterInsights has made the process very simple and beginner-friendly. It comes with a powerful Google Optimize addon that allows you to easily implement Google Optimize on your WordPress site.
If you don’t know what MonsterInsights is, it’s the most user-friendly Google Analytics plugin for WordPress.
It helps you to effortlessly set up Google Analytics in WordPress with just a few clicks. The plugin enables anyone to set up and use Google Analytics without touching any code.
Having said that, let’s go ahead and see the steps to set up Google Optimize in WordPress (the easy way).
Step 1: Install MonsterInsights Google Optimize Addon
Before we get started with Optimize setup, make sure you’ve properly installed Google Analytics on your site with MonsterInsights.
If you’ve already done that, you can go ahead and install the Google Optimize addon now.
To install the addon, you’ll need to go to Insights » Addons first. Then, navigate to the MonsterInsights Google Optimize addon and click the Install button.

Once it’s installed, click the Activate button.
Now that the addon is installed and activated, you can access your Google Optimize settings and add the snippet code. We’ll show you how later on in this tutorial.
Step 2: Create a New Google Optimize Account
Next, you’ll need to create a new Google Optimize account. Go to optimize.google.com and click Get Started.
Now you’ll have to enter an Account Name and a Container Name.

An account allows you to run experiments on one or more domains you own. You’ll likely need only one account. The container is where all your experiments and configuration settings will live.
For naming, here are our suggestions:
- Account Name: You may use your own name or your company name. (e.g. MonsterInsights)
- Container Name: You may use the domain name of your site. (e.g. MonsterInsights.com)
Then, Agree to the Optimize Terms of Service and click Create.
Step 3: Link Your Optimize Account to Google Analytics
To link your Optimize account to your Google Analytics account, go to the Accounts page in Google Optimize and click on a container.
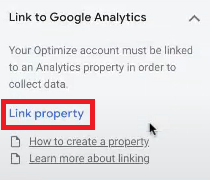
In the Container information panel on the right-hand side, click on Link Property.

Now, select the Google Analytics property that corresponds to the site on which you’ll be running experiments.

Step 4: Add Optimizer to Your Website
Now return to the Optimize accounts page and copy your Optimize Container ID. This should be in the format GTM-XXXXXXX or OPT-XXXXXXX.

Then, log into your WordPress dashboard, and navigate to Insights » Settings » Conversions.

You can also click the checkbox near Enable Google Optimize Async Page Hide Compatibility.
Doing so reduces the risk of page flickering (the original page appears briefly before loading the variation). It also ensures that users on slow connections have a better experience by only showing experiment variants when the Optimize container loads within the set timeout.
You can leave the remaining field unchanged.
Then, click Save Changes.
That’s it! You’ve successfully installed Google Optimize in WordPress.
Does Google Optimize Work With Shopify?
Shopify is an e-commerce platform that helps a producer sell their products online. If you are here, you probably have a Shopify account yourself. Shopify approves of A/B testing, meaning it integrates with Google Optimize or Optimize 360.
Before following the Google Optimize and Shopify integration steps, you need to have already created and set up Google Analytics, Google Tag Manager, and Google Optimize accounts.
Once you have those ready to go, you can get started with following the process to first install Google Optimize into your Shopify store and then get started with experimentation.
The method discussed below will guide you in the process of building a basic Google Optimize Shopify Integration.
Step 1: Create an Account to initiate Google Optimize Shopify Integration
- Step 1: For Google Optimize Shopify Integration, Sign in to your Google Optimize Account or Start for Free by creating an account if not done already.
- Step 2: Click on the Create Account button and type in a descriptive name for your Website Testing Project.
- Step 3: Read the Terms and Conditions for Data Sharing, select your Country, and click on the Next button available in the top right corner.
- Step 4: Now, an Add Container Dialog Box will Appear, Copy your desired Website URL and paste it in the box. Click on the Create Button to start your Google Optimize Shopify Integration process.

Step 2: Link Google Optimize Shopify using Theme Files
- Step 1: Now, let’s add Google Analytics by Navigating to the Link to Google Analytics drop-down menu on the right side of your screen. Click on the Link Property option.
- Step 2: The “Link a Property” drop-down menu will appear on your screen. Select the desired Analytics option linked to your Shopify project. Make sure the UA Id matches the one in your Shopify Account. Check the All Website Data box and click on the Link Button.

- Step 3: Add an Optimize Snippet to your Site Dialog Box will pop up. Click on the Get Snippet option.
- Step 4: A window with Optimize Snippet Code will appear. Click on the Anti-Flicker Snippet option. A new tab will open, containing the code for the Anti-Flicker Snippet. While setting up the Google Optimize Shopify Integration this additional snippet is helpful for situations where the webpage is flickering between the two variants you are testing.

- Step5: Login to your Shopify Account in another tab of your web browser. Navigate to the Online Store option on the left side menu and click on the Themes Option.
- Step 6: Click on the Actions Option and choose Edit Code from the drop-down menu. Search for the theme.liquid file using the search box and paste the copied Code from Anti-flicker Snippet and then from Googe Optimize Snippet below the <head> tag. Do remember to replace “ CONTAINER ID” in the Anti-Flicker snippet code with your actual Optimize ID.

- Step 7: Click on the Save button available on the top right corner of your screen. A message “Asset Saved” will pop up. This ensures all the changes have been saved for the Google Optimize Shopify Integration.
Step 3: Set up a Test for your Website
- Step 1: Go to Your Google Optimize Tab and Click on the Let’s Go Button to begin testing your Website using the Google Optimize Shopify Integration.
- Step 2: Type in the Name of your test and the URL of a particular Webpage you want to test. Choose the desired Test type and click on the Create Button. Here, in this example, A/B testing is chosen.
- Step 3: Now, click on the Add Variant button and type in a descriptive name of the new version of the page. Click Done to save it.
- Step 4: You can click on the Edit button and make the necessary changes for the new version using the Optimize Visual Editor.
- Step 5: Now, scroll down and you can choose the business metrics you want to track in the Google Analytics Reports by clicking on the Customize button in the Audience Targeting Section.
- Step 6: To see if the Google Optimize Shopify Integration is working properly, click on the Run Diagnostics button under the Settings section. Now, a message will appear for successful Google Optimize Shopify Integration.


How do I Test Google Optimization?
1. Set Up a Google Optimize Account
The first step is to visit the Google Optimize website and sign up for a free account. Just click the Get Started button.

Next, fill in some optional details about data permissions and sharing and click the Done button.
You’ll now head to the Google Optimize dashboard. Click the Let’s Go button to create your first experience.

This expands a slide-out panel where you can give your experience a name, add the URL for the web page you’d like to use, and choose a test type.
We’ll use the A/B Test type for this experiment; however, later in this post, we’ll show you how to test 2 different landing pages with the Redirect Test.
With the A/B Test type, you can test different elements on your websites, such as different CTA buttons, images, and even your entire landing page design.

After choosing your test type and entering your primary URL, click the Create button.
2. Add a Variant to Test

The next step is to add a variant of the page you want to test. Start by clicking the Add Variant button to open a panel on the right-hand side of your screen.
Now give your variant a name and click Done. In this example, we’re testing a different version of the button copy to see which version gets more conversions.

With your variant set up, it’s now time to edit it with your desired changes. Click the Edit button to get started.

You’ll see a popup asking you to install a Google Chrome extension. This allows you to use a visual editor to customize your variant, such as different button copy, placement, etc.
So, click the View Extension button and follow the instructions to add it to your Google Chrome browser. After, refresh your Google Optimize page and click the Edit Page button once more.
This time, you’ll see an editable version of your web page. You can click anywhere on the page to make the changes you need.
In this example, we’ll select the button copy and click the Edit Element button on the right.

From there, you can click Edit Text and enter your new text copy.

When you’re happy with your changes, click the Save button in the top right corner of your screen, then click Done to head back to the Google Optimize dashboard.
3. Choose Page Targeting Rules
Under the variants section, you can choose where your experience runs on your website. By default, this is set to when the URL matches the URL you used in step 1.
However, clicking the Add URL Rule link allows you to set a rule for if a URL, Host, Path, or URL fragment:
- Matches
- Does not match
- Equals
- Contains
- Starts with
…a particular value.
We’ll leave this setting with the default options for now.
Below that section, you can customize the audience targeting and add a description to help team members understand your experiment.
4. Connect to Google Analytics
Google Optimize uses Google Analytics to measure your experiment results. So for this step, you need to link your Analytics account.
Click the Link to Analytics button, then choose your property from the drop-down menu on the right.

5. Set Your Test Objectives
With your Analytics account linked, you can choose from a range of different test objectives or set a custom objective of your own. Objectives are metrics that your test is measured against, which helps you learn which variant performs the best.
To set your objectives, click the Add experiment objective link and choose an option from the dropdown menu.

You can choose from a list of goals associated with your Analytics account or create a custom goal based on your specific needs.
6. Install the Google Optimize Snippet
Now that your experiment is set up, you need to install Google Optimize on your website. How you do this depends on how you have Google Analytics set up.
If you’ve added Google Analytics to your website manually, all you need to do is click the View Instructions link.

Then, on the following screen, copy and paste the Google optimize code into your header.

Yet, if you installed Google Analytics with a WordPress plugin like MonsterInsights, you’ll need to enable Optimize in that plugin.
To do that, log into your WordPress dashboard and navigate to Insights » Settings » Conversions. Then add your Container ID into the Google Optimize Container ID field.

You can find your Container ID by selecting All Accounts in Google Optimize.

You can also click the checkbox near Enable Google Optimize Async Page Hide Compatibility.
This reduces the risk of page flickering (the original page appears briefly before loading the variation). It also ensures that users with slow connections have a better experience by only showing experiment variants when the Optimize container loads.
7. Run Your A/B Test
Now that you’ve correctly set up and installed Google Optimize, you can start running your experiment.
Head to the top of the page and click the Start Experiment button to launch your test.

Great work! Your first Google Optimize A/B test is live. Let it run for a while, and then you can stop the test using the same panel and check your results.
How Does Google Optimize Split Traffic?
Split testing is the process of splitting your website traffic and showing them different versions of the same page or campaign. You’ll measure some key metrics – these may vary depending on your goals – to understand which version performs the best.
It’s a strategy that helps towards improving your conversion rate optimization, by allowing data from real customers to guide your decisions
The things you test will vary, but before running any type of test you should have a clear idea in mind of what you want to achieve, and good reasoning why your proposed change could help improve user experience and boost conversions.
Consider things like:
- Where users are entering and exiting your website
- Key transactional pages and forms
- Call to action buttons and messaging
- Headlines, sales and product copy
For example, let’s say you’d like to test changing the text of your Call To Action button to see if it results in more users completing your enquiry form. It’s simple to do this with Optimize, and here we’ll show you how.
Google Optimize is a free split testing tool that allows you to test different variations of your web pages. It pulls data from Google Analytics and measures your variants against your chosen objective. This might be a custom objective like a file download or a more generalized engagement metric such as Time on Page.
Setting up your split test
To get started, you’ll need to head to optimize.google.com and log in using a Google Account. You can also access Optimize by navigating to “Experiments” within your Google Analytics account.
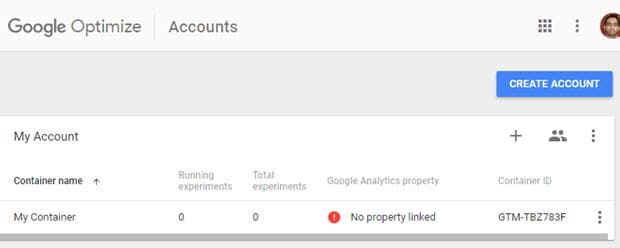
Accept the terms and conditions, and create an account. Usually, the account name will be the company name, then you’ll create a “container” that defaults to the URL of the website.
This is how it will appear for an example company:

If you manage multiple websites, you’ll see a list of accounts in your Optimize dashboard, like this:

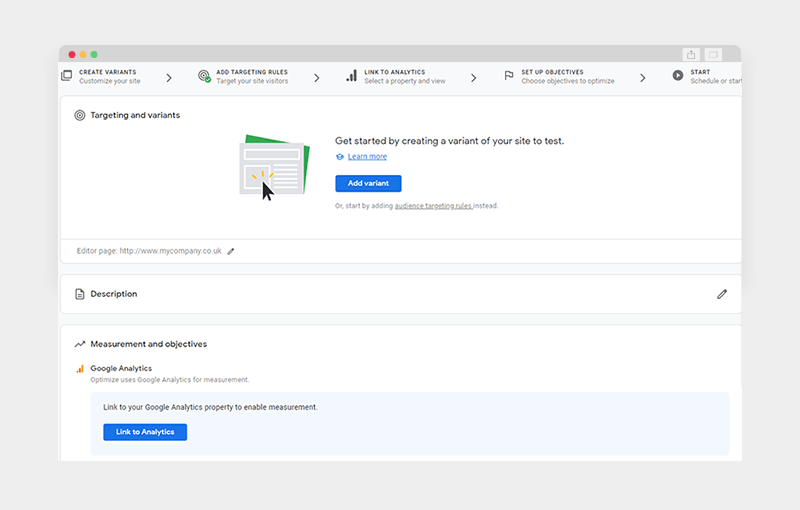
Creating your first Google Optimize experience
Now your account is set up, it’s time to create an experience. Experience is a fairly all-encompassing term that Google uses to describe the different experiments you can run. For this article, we’ll be focusing on the A/B testing option specifically.
Before you can start getting creative, you need to connect your A/B test with Google Analytics. Name your experience, then scroll down to Measurement and Objectives and click “Link to Google Analytics”. Once you’ve selected your Analytics property of choice, you’ll be able to choose custom objectives and measurements to analyse the success of your experiment.
Installing the Optimize snippet
Optimize connects to your website using a snippet of code that can be added via Google Tag Manager or manually if you work with developers who can easily add code to the<head> of your website.
It’s a similar process to installing Google Analytics or any other tracking code, and once you’ve added the code just scroll down to the Settings section of your experiment and verify the tracking code to ensure it’s installed correctly.

Creating a variant
This is where the fun begins! Click on “Create Variant” and it’ll default to a 50/50 split between your original page and your variant (you can edit these settings and add further variants if you want to).

Click “Edit” on your Variant to open a full-page visual editor with a range of options. This on-page editor allows you to make changes for use in the A/B tests without actually needing a designer or developer to create visuals or update code on your actual website.
It will work on any platform, so don’t worry if you have a bespoke website or off the shelf CMS, the on-page editor can handle it.

Now, you can edit away. Right-click on individual elements to remove or edit, and use the top navigation to navigate between them. You can choose to edit the HTML (an option within “Edit element”), or use this as a straightforward visual editor.
For this example, we’ll keep it code-free and make a simple text change using the editor.

Here, we’ve changed the text for the call to action in the top right corner of the Edge of the Web homepage. You can make much more complex changes than this, but we’d recommend only testing one change at a time.
Now, it’s time to set your objectives and start getting results.
Setting your split test objectives
When you set your objective, you’ll be able to choose from the default list below, or opt for a custom objective.

Choosing a custom test objective will allow you to choose a custom event or set it to track pageviews. Pageviews could be on one specific page or multiple – for example, you could track all of the pageviews on your blog. Use the Rule Validation at the bottom of this section to ensure it’s set up correctly.
Now, you should have a clear idea in mind of what you want to achieve before you get started, but Optimize does allow you to choose one Primary objective and two Secondary objectives. This is great for combining a specific custom objective with two of the more generic options to solidify your findings and provide a more well-rounded view of how your users are engaging with your change.
So, for our call to action example above, our Primary Objective will be submissions of the “Get a Quote” form, which is a tracked Google Analytics goal. But, we could set a Secondary Objective of clicks on the call to action button. You could also choose some more generic engagement metrics for your secondary objectives, like a lower bounce rate or higher average session.
What can I Change in Google Optimize?
When you create an experiment in Google Optimize, you get to edit the copy of the webpage (also known as the editor page) you created the experiment for. That copy, once optimized, will work as a variation to compete with the original. You get to edit it through the Visual Editor. It is a WYSIWYG (What-You-See-Is-What-You-Get) editor.
In the visual editor, apart from the editor page, you get two more elements:
1. App Bar
The app bar of Optimize has various important tools to help you set up your experiment. It works as a guide to navigate and keep you aware of the basic info you should know about the experiment, such as experiment name, status, the number of variations, diagnostics, etc.
The other part of the app bar is the one which works as an editor. It includes options such as:
- Element selector, which selects the elements and makes changes to it.
- Code editor, to add any additional CSS and JavaScript.
- Breadcrumbs, to explore the navigation path.
- Interactive mode, to make changes to the interactive elements, which require specific actions from the user.
- “Move the setting,” to move any element on the editor page.
The above process can be different depending on the type of the experiment, such as in cases in which the client wants to make a change to the original page, too.
2. Editor Palette
This works alongside the app bar. Supporting the editing options, the app bar initiates, and the editor palette has editing controls for the elements selected. It is a dynamic feature that also allows you to load CSS and JavaScript to the element selected. That way a developer can customize it fully, breaking the customization limitation some website themes have.
Since Google Optimize is a free tool, it mostly relies on the ability of the user. It consists of features that can handle dynamic changes, but instead of using any auto settings, it enables you to use them to customize the experiment as much as possible. This gives the controls to the developer to make use of each feature to the fullest.
What is Google Optimize Code?
Optimize is installed by adding a small snippet of code to your website to display new experiences to your visitors. There are different ways to install Optimize depending on your website’s configuration and it’s important to tag your site properly to get the best performance.
Answer the following questions to find the version of Optimize that’s right for your website:
1: Do you use a Tag Management Solution (TMS) like Google Tag Manager (GTM)?
- Yes – Continue to question #2.
- No – Skip to the Synchronous or asynchronous table.
2: Can you (easily) edit the <HEAD> of your website’s HTML?
- Yes – Continue to the synchronous or asynchronous table.
- No – Use the Optimize tag template in Google Tag Manager.
3: Synchronous or asynchronous?
Answer the questions in the left of the table below to help decide between the synchronous and the asynchronous version of Optimize:
| Synchronous (sync) | Asynchronous (async) | |
|---|---|---|
| Coverage vs. speed? | Prioritize experiment eligibility/coverage with a small performance hit. More visitors will be eligible for experiments | Prioritize page loading speed over experiment eligibility/coverage. Visitors that timeout may be ineligible for experiments. |
| My visitors use… | High-speed connections (5G, 4G/LTE) | Lower-speed connections (3G or slower) |
| Should I add the anti-flicker snippet? | Yes – If you’re targeting Google Analytics audiences, Google Ads, or ‘Time since first arrival’ (behavior). No – If you aren’t using any of the targeting types mentioned above, you don’t need to install the anti-flicker snippet. | Optional. In most cases you don’t need to install the anti-flicker snippet. |
What is the Purpose of Google Tag Manager?
Tag Manager gives you the ability to add and update your own tags for conversion tracking, site analytics, remarketing, and more. There are nearly endless ways to track activity across your sites and apps, and the intuitive design lets you change tags whenever you want.
Easy-to-use error checking and speedy tag loading ensure your mission-critical data is collected reliably and accurately. The IT team will feel confident that the site is running smoothly, so everyone’s happy, even during busy holidays or the launch of a new campaign.
With Tag Manager, you can add or change your tags as needed. Tag Manager supports all tags and offers easy-to-use turnkey templates for a wide range of Google and third-party tags for web and mobile apps. You can also use Tag Manager to manage how your tags behave once users make their cookie consent decisions.
Workspaces and granular access controls allow your team to work together efficiently, while multi-environment testing lets you publish to different environments to ensure things are working as expected.
Enterprises with Tag Manager 360 can give more users tagging access, with defined levels of access to certain pages.
How do you Use Google Analytics?
Before you start using Google Analytics, you’ll have to set up a Google account. This means you must have a registered Google Account email address and password.
Once you’ve created a Google account, that doesn’t mean you automatically have access to GA — rather, you have to register for Analytics. But the important thing to note as you go to set up GA is that you can only access the tool by using a valid Google account.
Here are the steps involved in using your Google Analytics account.
1. Create a Google Analytics account.
First, you’ll have to create a Google Analytics account. Or, sign in to your current account.
2. Add the name, URL, and industry of the website you want to track.
Choose which account you want to add the property to. You should create and name your Property at this point and enter the website’s URL as well as industry and reporting time zone. Then you’ll be able to Create and Finish this step of the process.
3. Add a view to your property.
Go to the account and property you want to add a view to — use the menu to Create a View, name your view, select the type of view (web or app), and answer a few other questions. Remember, you can add up to 25 views to a property in GA.
4. Add your tracking code directly after the <head> tag of your site.
When you create a property, you’ll have access to a unique ID for tracking and a global site tag (code you need to add to each site page you want to measure). This is how you’ll be able to collect data in your property.
Then, paste your global site tag right after the opening <head> tag on each site page you plan on measuring.
You’ll be asked to choose your type of site (static, dynamic, web hosting, Google Tag Manager) so that you can set up the data collection accurately.
5. Visit your GA portal and verify the code is working.
Lastly, verify your code is working. You can do this by looking at the Real-Time reports section while clicking around on your site in a different tab or on your phone. The report should show at least one visitor to the site (that’s you!)
And that’s pretty much it! After that review, you may be wondering the following:
Do you need to add the GA code to every page of your site?
That’s a lot of manual work — especially if your website has more than 50 pages. Plus, what happens when you create new pages? Do you need to add the tag every time?!
Relax, because the short answer is: no.
The longer answer: you only need to add the tag to every page template. So, if you have one page type on your site (meaning every individual page uses the same header module), you only need to add it to that module — and it’ll be applied to every page.
If you have two page types, you’d need to paste the code into the two separate header modules. Three page types? Three header modules.
And if you use a CMS like HubSpot, this task is even easier. These tools come with a separate field where you paste your tracking code just once. HubSpot users can follow these simple instructions for adding GA.
Additionally, to use GA successfully, you need to understand dimensions versus metrics.
Google Analytics Dimensions and Metrics
I’ve found the easiest way to think about it is:
- Dimensions = categorical variables. Simple examples include names, colors, and places.
- Metrics = quantitative variables. Basic examples include age, temperature, and population.
Or as my Data Analytics professor put it, “Metrics are what you can do math on.” Not the most eloquent phrasing, but it works.
Dimension Examples
- Browser
- Location
- Landing page
- Device
- Customer type
Metric Examples
- Sessions
- Pageviews
- Conversions
- Bounce rate
- Session duration
In any GA report, your dimensions are your rows and your metrics are your columns.

Custom Dimensions and Metrics
GA lets you create custom dimensions and metrics from Analytics data plus non-Analytics data. To give you an idea, suppose you track the membership type of customers who have created an account in your CRM. You could combine this information with page views to see page views by member type.
Or maybe you run a blog. If you want to understand how audience engagement impacts other metrics (like conversions, pages per session, etc.), you could create three custom dimensions for each type of reader:
- Advocate: user who shared one-plus posts on social media
- Subscriber: user who signed up for your email list
- Customer: user who purchased premium access
Using these dimensions will give you invaluable information.
What is AB Testing in SEO?
A/B testing (which is also referred to as split testing) involves changing one or more elements of a page, and comparing how the original page and test page variant perform when shown to different segments of an audience.
Your original page will be variant A, and your test page version will be variant B.
This is usually a straightforward test that compares the performance of both pages (or all variant pages in a set if you have more than two) and tells you which one converted at a higher rate.
Knowing what impact a change to your website has had on organic traffic from search engines can be challenging to measure. Merely making a change to your website and looking at the impact of metrics like rankings and click-through rates (CTR) isn’t good enough.
Unless you can control for external factors, there’s no way of knowing whether the changes in rankings or CTR are because of the change you made or some other external factors.
Read Also: Top 10 Sites for Your Career
Making a change and reviewing metrics is often referred to as before and after testing. While before and after testing is better than not measuring anything at all, it’s not a controlled test and you can’t use it to draw firm conclusions – it’s easy to be misled and think that your change was responsible for the observed impact, when it could just as well have been a competitor changing their site, or many other external factors.
In addition to not having a control group of pages in before and after testing, the fact that the length of time it takes for search engines to crawl your site and take the changes into account is also unpredictable complicates the analysis. It could be instant or it could take weeks. That makes looking at data, like traffic or rankings, and trying to line it up with a change you made near impossible.
Controlled SEO split-testing is when you split a group of statistically similar pages into control, and variant groups then make a change to the variant pages.
You can compare the organic performance of both groups against each other and against an expected forecasted level of traffic had no change been made to the site.