Any digital marketer would be interested in knowing the exact performance metrics of their website. For marketers who lack technical expertise, it is difficult to figure it out on their own. For technical tasks, such as modifying source codes and utilizing tracking systems like Google Analytics, a marketer frequently needs the assistance of a developer.
Another one is to set up an event or objective in Google Analytics. Developers typically make minor edits to HTML source code in order to track specific visitor behavior on their websites.
If you’re not a developer but want to do it on your own, Google Tag Manager (GTM) will help you. GTM allows you to deploy simple tags to set up goals or track events without advanced technical knowledge or a developer. Let’s dive into more details on how to set up event tags and track them.
Google Tag Manager (GTM) is a free tool that allows you to efficiently manage tracking codes known as tags on your website or mobile app. You can easily manage and deploy tags on your website without a developer’s help.
Many marketers use Google Analytics to measure the performance of their websites because they can get insights about the traffic to their websites without having to set up additional configurations. Even the basic information that Google Analytics provides, such as the traffic sources/medium, the duration time, and the bounce rate, will be meaningful enough to guide you to improve your website. Its Behavior Flow Reports also help you get a general idea about which path leads to conversion.
Then what if you want to measure and assess more specific goals? Let’s be more specific. What if you want to measure the number of clicks on a certain button? Google Analytics has features like event analysis and goal setup using the event. But, to analyze the event, you need to edit the HTML source code. This is where developers come in to help you. Instead, now you have Google Tag Manager that will deploy event tracking tags to analyze the event and set up goals.
If you need some insights about a certain event from Google Analytics, refer to the event reports. To see the data of the report or make it trackable by Google Analytics, you need to modify source codes for the parameter of a certain event. The event parameter is shown in the Google Analytics Event Reports. You must set up the parameter for the event category and event action. The event label and value are optional but available for more specific tracking.
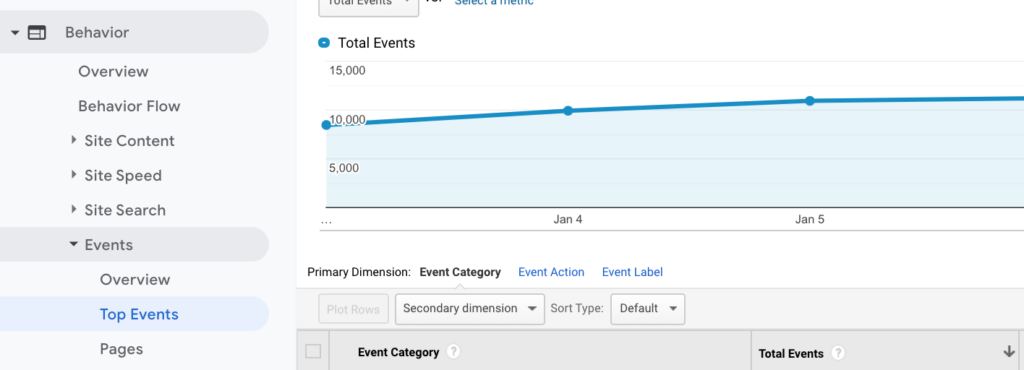
Google Analytics’ Events Report – The statistics of each parameter including event category and event action are displayed.
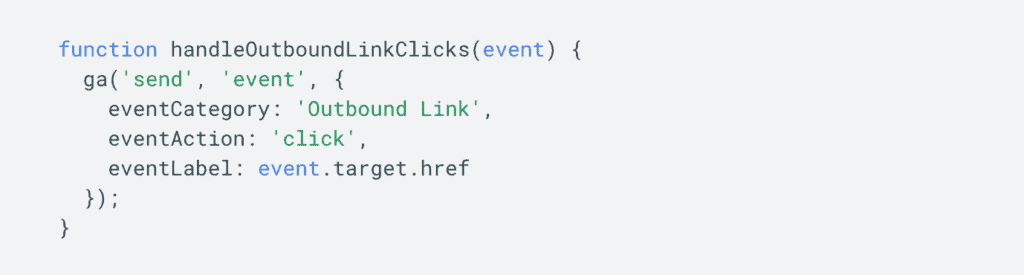
If you are going to configure tracking tags for each event without using Google Tag Manager, you have to insert the below codes manually. (Visit Google Analytics Sample Code Help for more sample codes). It is time-consuming and painstaking for marketers to edit source codes one by one. That is when Google Tag Manager becomes handy as it can create and deploy event tracking tags for you so that Google Analytics can track them.
Before configuring event tags with Google Tag Manager, it is crucial to understand how GTM works and how Google Analytics tracks those tags.
we’ll deploy tags using GTM and set up goals, and check data on Google Analytics. This is how we’re going to do it. Let’s say that you want to know the number of clicks on the Contact Us button on the Global Navigation Bar (GNB) of your website and you earn three dollars per click.
1. Setting Up A Trigger
First, you need to clarify in which condition the tag should fire. In other words, you need a trigger to tell GTM when and how to fire a tag. Click trigger is a basic function offered by GTM. Let’s set up event tracking to fire a tag on any clicks on all pages.
Log in to your GTM account, and click “Triggers” and then “NEW.” A window will pop up to set up a new trigger. Click “Trigger Configuration,” and you’ll see the box to choose the trigger type as in the image below.
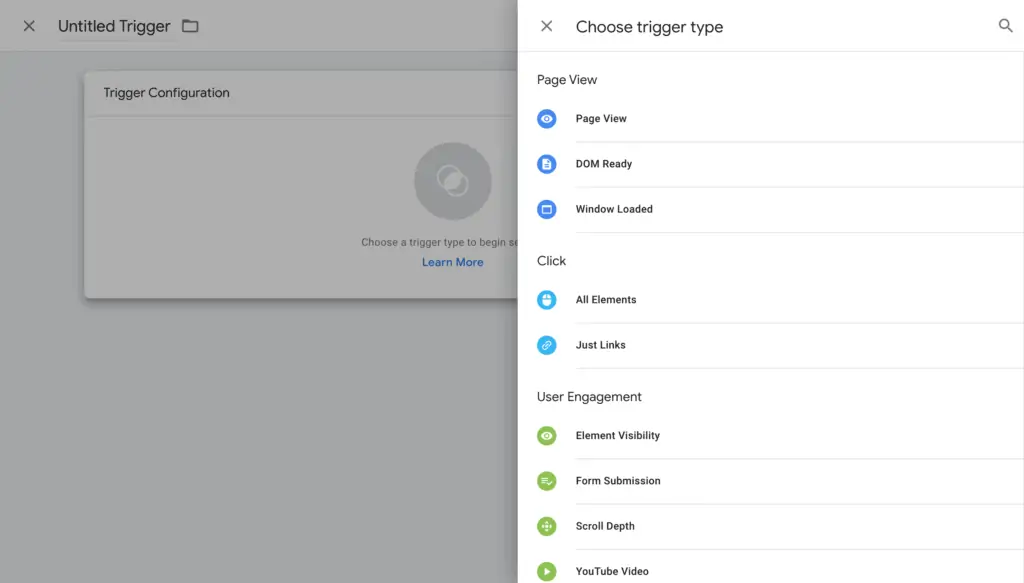
Trigger type allows you to select the types of events to fire the trigger. You can use basic triggers, or custom-made triggers by writing JavaScript codes on your own.
To make tags to track click events, you need a trigger to fire on clicks of visitors. Choose one of the two types as you can see in the above image in the “Click” category. Select “All Elements” as we’re going to track click events on the GNB menu.
Read Also: Advanced Google Analytics Tracking Techniques for E-commerce
Now, it’s time for more detailed configurations. As we want the trigger to fire on visitors’ clicking a certain button, we want “Some Clicks,” not “All Clicks.” Then we need to be more specific about clicks on which we want the trigger fires. There are many ways to do this, but let’s take Twinword’s website as an example and designate a CSS ID selector to fire the trigger.
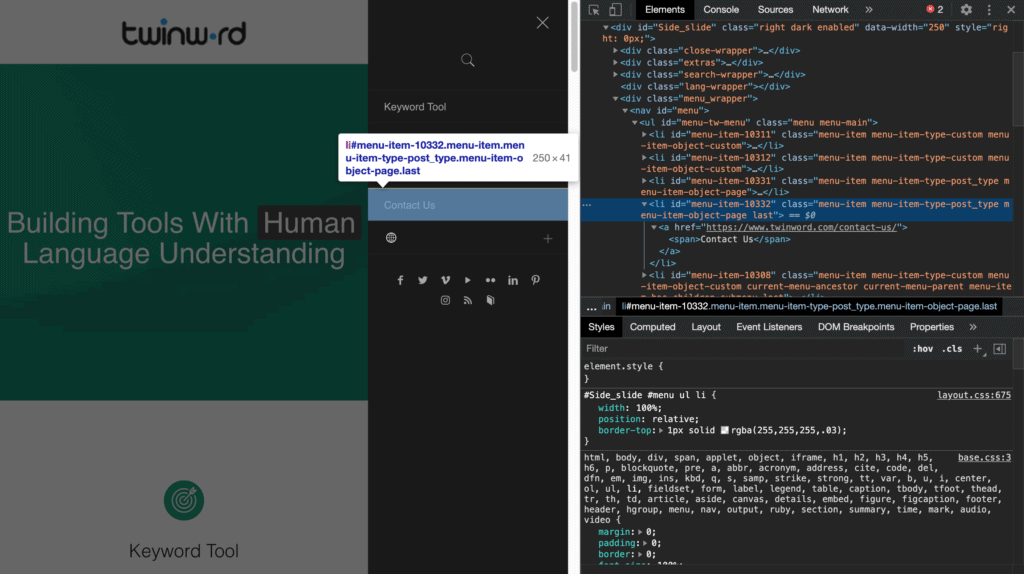
You can check the selector in the corresponding source code.
The Contact Us button of Twinword’s GNB has an ID designated as menu-item-10332. Using the designated CSS selector, you can configure the condition of the trigger. Configure it as below so that the trigger fires only on clicks on the Contact Us button.

We’ve set it up to fire the trigger only when visitors click the button with the same CSS ID selector, which is menu-item-10332. Therefore, now the trigger does not fire on all clicks, but only on clicks on an element that has the same ID as the Contact Us button, menu-item-10332.
Then click “Save” to save all configurations. This is how you set up the trigger for click events. There are also other ways to set up triggers like using the content of links or texts of what visitors click. So, choose the way that best serves your purpose.
2. Setting Up An Event Tag
Once you finish setting up the trigger, it’s time to create tags. Before creating click event tags, we should check on what kind of data we need to track events in Google Analytics. As mentioned earlier, there are two values for event tracking: event category and event action. Along with these two basic values, the event label is commonly used, too. In Google Tag Manager, you can easily type in these three types of information.
Basically, they tell Google Analytics how to distinguish the event we want to track from other events. As in our scenario, we want to track the event of clicks on the Contact Us button. You can key in the necessary data just as in the screenshot below to create the tag for that event.

Unlike the event category or action, we used {{Page Path}} for the label, one of the basic variables offered by Google Tag Manager. Many basic variables are really useful for marketers who have little technical knowledge. If you designate Page Path as the variable for the event label, you can easily find out on which page the event occurred without having to manually write JavaScript codes.
For the trigger, designate the GNB Click – Contact Trigger we already made so that the tag can be delivered to Google Analytics whenever a visitor clicks on Contact. It becomes big trouble if the trigger is not firing properly or other triggers are used. Therefore, it is important to make the name of the tag and trigger straightforward to clearly indicate which tag goes for which trigger.
After you deploy the tag, Google Analytics Event Report will show you the number of events for each event category, action, and label. Unlike the event category and action whose value was pre-designated, the event label designated by variable {{Page Path}} will show you where the event occurred.
3. Setting Up Goals With Google Analytics.
If you have set up the trigger and tags and confirmed that data is successfully being recorded on Google Analytics, you are in the final step: setting up goals. You can set up goals with Google Analytics without using GTM. However, the event category and action that you configured in advance in GTM will be helpful for setting goals more precisely when you target a certain event.
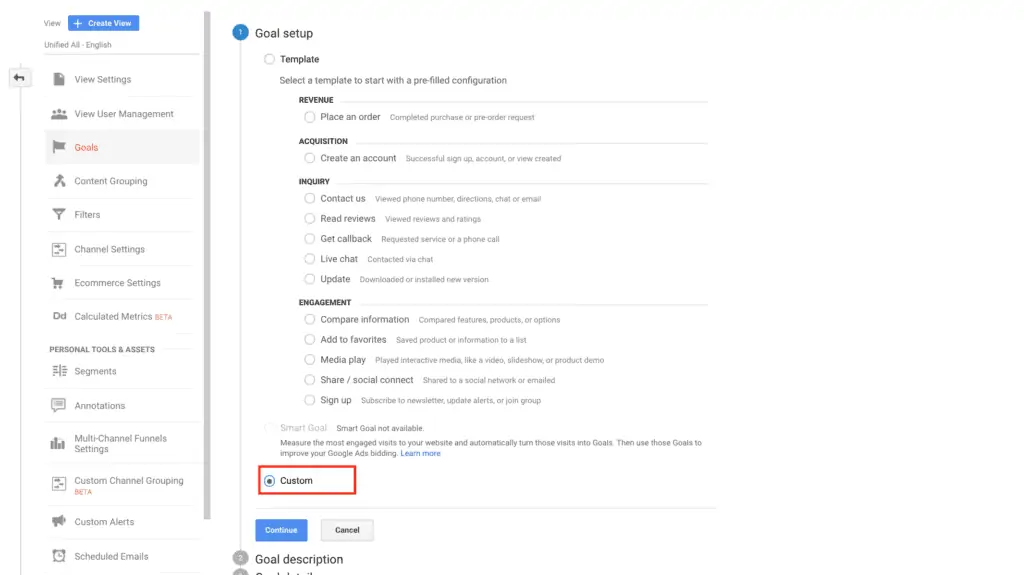
You will gain more detailed and precise statistics by deploying event tracking for certain behaviors of your website’s visitors and granting different values according to each behavior. In order to set up Google Analytics goals, go to Admin > View > Goals, and create a new goal. Among several ways for setup, it’s common to make the goal conversion be recorded when the event tag you initially set up in GTM is detected. Let us assume that one click on the Contact Us button is worth 3 dollars and set up a goal based on it.
First, you need to decide the types of a new goal. Google Analytics provides templates that you can apply according to the goal and purpose of your website. But as click event is not included in the templates, you need to choose “Custom.”
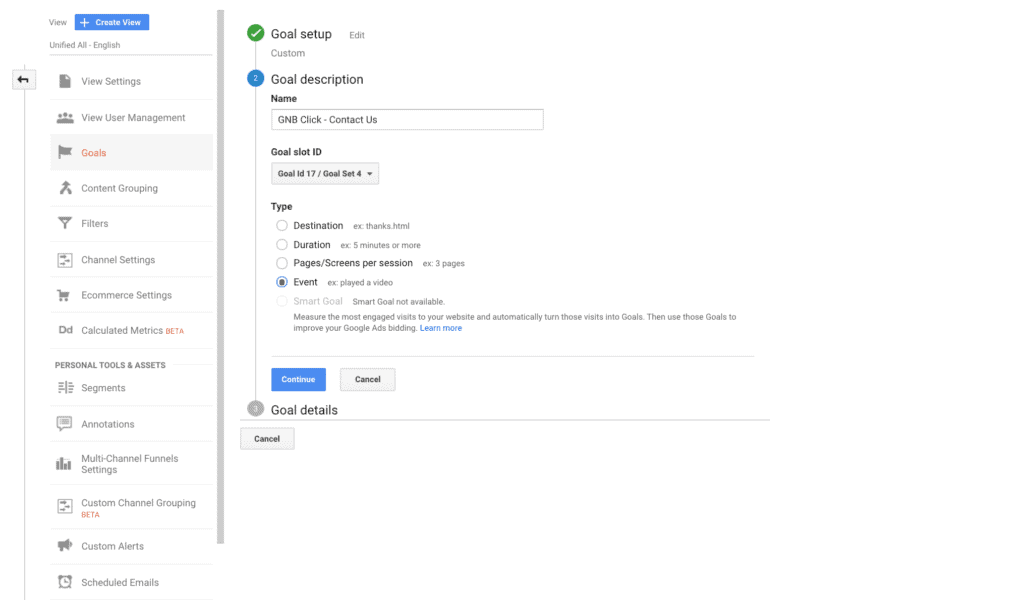
In the goal description, provide information about the goal for easy management of your goal. The name should clearly and intuitively represent what the goal is. Choose “Event” for the type because we already implemented the event tag in Google Tag Manager.
If you move on to Goal Details, put information about the tag you previously deployed on GTM in Event Condition. As seen in the screenshot below, I typed in values in category and action as what I keyed in on GTM and left the label blank as it is variable. I assigned 3 dollars per conversion, but you can assign any amount of your choice.
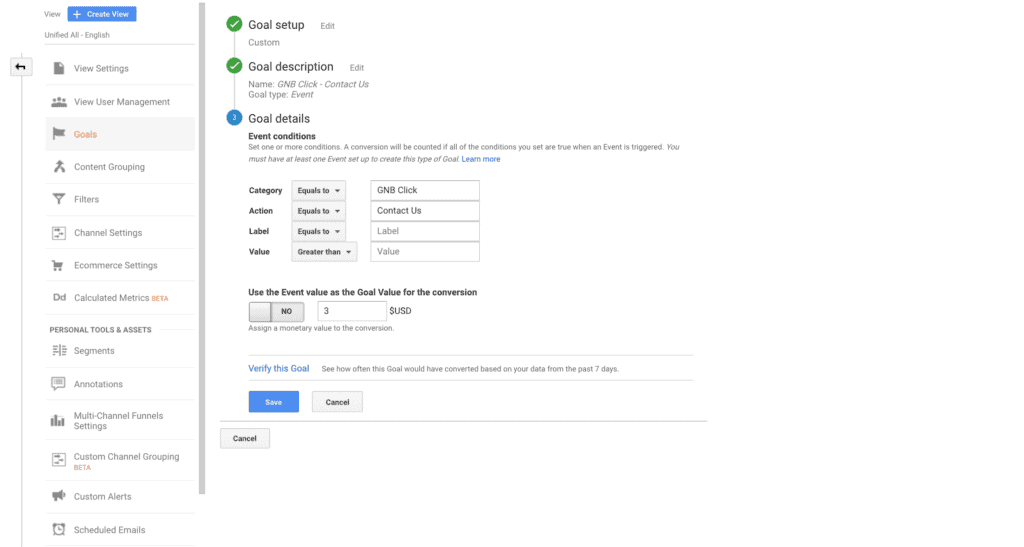
Once everything is done, click “Verify this Goal” to see how often this goal has converted based on your data from the past 7 days. If the conversion rate is 0, check again if there was any mistake in the previous process. Otherwise, click “Save” to apply to create a new goal.
How do I Set up Google Event Tracking?
To use event tracking you’ll need to have GA4 installed on your website. You can do this by adding the code to all pages on your site or by adding Google Tag Manager code to your site and then configuring GA4 tags and triggers and variables.
Before you jump into setting up event tracking, it’s important to consider the following points:
- Decide on which elements of your site you want to track, whether it’s PDF downloads or clicks on outbound links.
- Adopt a consistent and clear naming convention for the different event names you’re going to use when you’re setting up event tracking. Every name you give to an event is the only means you’ll have to understand what it does. If your naming isn’t sensible then your report won’t make a lot of sense later on.
- Decide whether you want to set up auto-event tagging or manually tag links on your site.If you have a lot of documents and page elements to track it may be worth setting up Auto Event Tagging and using Google Tag Manager Events.
A snippet of custom code is added to the link code on the items you want to track on your website and when the item is clicked, the element is tracked and displayed as an event in Google Analytics.
The event tracking code consists of four elements that you can define to describe a user’s interaction on your website:
- Event Name (Required) is the name you give to the event, it’s the main thing you’ll see in your reports within GA4.
- Event Parameters (Optional) are the extra bits of data you can put into your events, e.g. the page it occurred on, or how far down the page they scrolled
The event tracking code for an event tracked link in GA4 looks like this:
gtag(‘event’, ‘<event_name>’, {
<event_parameters>
});
The code is placed after the href link text as illustrated in the example below:
<a href=”www.examplewebsite.co.uk/company_brochure.pdf” onclick=”gtag(‘event’, ‘<event_name>’, {<event_parameters>});”>
The event name and any parameter labels are replaced by the values that you decide to enter. An example of an event-tracked link with entered values is further down the page.
Depending on the number of events you’d like to track, or the level of control you’d like to have on the tracking parameters for your events, you can setup up auto event tracking, or manually tag links on your website.
If you have lots of documents and page elements to track it’s worth using auto event tagging, which you can do using Google Tag Manager. Auto event tagging will fire on the following:
- When users click on links.
- Clicks on any type of page element.
- After a certain visit duration or at timed intervals.
- On submission of a form.
If there are other actions that you want to track then you can use Google Tag Manager to set this up.
GA4 Event Tracking is a valuable addition to measuring user interactions on your website. It can be used in combination with traditional GA4 goals to measure micro or macro conversions on your site.
Using Google Tag Manager and Tag Manager events means it’s easier for you to set up and control the events you want to track, or you can still change the code on your site manually to add events if you prefer.