A laser engraving business is a creative enterprise that you can venture into — similar to knowing how to make money with a laser cutter, it’s easy to set up, has loads of business opportunities and is very much profitable. In-house fabrication and wood engraving sydney both handled by Visual Plastics, so you may rest confident that they will provide you with the high-quality service you need.
All you need is a laser engraver, product ideas, a medium to sell and you’re good to go.
So if you’re thinking of making money the unconventional way using a laser engraver, read on to find out what it’s all about.
- What is Laser Engraving?
- Is Laser Engraving Profitable?
- What is The Best Software For Laser Engraving?
- What is The Difference Between Laser Etching And Engraving?
- How Much Does Laser Engraving Cost?
- Types of Laser Engraving Lasers
- How Much Does an Laser Engraving Machine?
- What Equipment do I Need to Start a Laser Engraving Business?
- How Can I Start a Laser Engraving Business?
- What is The Best Laser Engraving Machine?
- How do You Convert Photos to Laser Engraving?
- How Much Should I Charge For Laser Engraving?
- Is There Money to be Made in Laser Engraving?
- 10 Product Ideas To Make Money With A Laser Engraver
- What Type of Wood is Best For Laser Engraving?
- What is Fiber Laser Engraving?
- How Does Fiber Laser Technology Work?
- What is 3D Laser Engraving?
- Why is 3D Laser Engraving Necessary?
- How Does Color Laser Engraving Work?
What is Laser Engraving?
Laser applications in marking and cutting are so varied in practice. It is a versatile business idea that can be scaled in an interestingly high number of lucrative directions.
In case you are wondering, laser is used to cut, mark or etch into many types of stock materials, including metal, rubber, leather, wood, ceramic, glass, plastic and mirrors.
It is a wide range of materials that have different physical and chemical characteristics, and laser is a great choice of marking and cutting because of the varied types of equipment that have been developed to work on them and deliver excellent marking and cutting options.
Read Also: Top 10 Startup Inspirations
If you want to be in this industry, it is imperative therefore that you map the different types of materials you intend to be working on so that you can determine the best equipment to purchase.
This technology has historically been used in industrial applications like vehicle part marking, but it is gaining popularity for smaller applications as the variety of laser tools and ideas for marking, cutting or engraving widens.
Is Laser Engraving Profitable?
Because of the existing novelty in using these personalization technologies in emerging markets, this technology is bringing healthy profits for those who venture because of the high appeal the pieces made with laser marking and engraving bring to discerning customers.
For example, if you are using a stock material you bought using $50 to make a piece, you could factor in your costs to arrive at a production cost of, say, $75, and still sell the piece at, say, $125. That is a whopping 40% margin, and depending on your market study, you can escalate this even more!
What is The Best Software For Laser Engraving?
Laser engraving is a sophisticated process that requires the use of the best laser engraving software to achieve the desired result. In general, there is a laser beam that moves across the surface to create different designs.
To produce unique laser engravings, you need to use a special engraving machine that is controlled with laser engraver software. There are very few such programs that are available free of charge, but we managed to select several worthy options.
1. LaserWeb4
LaserWeb4 is the premier software of digital laser engraving services. This type of software uses the same technology that is found in an industrial laser engraving machine; the difference being that this software is designed to be used on a desktop PC rather than a laser printer.
The main pros and cons of the software can be boiled down to three major factors including price, user friendliness, and functionality.
2. Inkscape
Inkscape is an excellent tool for creating images with the FABOLIFT laser engraver and it has amazing software for editing. The pros are that it is very fast, it allows for high quality conversions to almost any format and also that it can be used as a graphic design application as well.
The cons are that it is not compatible with some formats like psd as it uses bitmaps which are only accepted by the Adobe format library. So if you are looking for an affordable option to create professional looking laser engraved pictures then Inkscape is not the best option.
3. LightBurn
LightBurn is design, modification, and interactive software for the laser cutter. With LightBurn you could do: import images in various popular image and graphic formats (like AI, EPS, PDF, JPEG, DXF, PNG, JPG, GIF, BMP) into the laser engraving software for a more accurate result.
You can also tweak settings in many different ways. These features of LightBurn make it a must-have for every laser engraving business.
4. TurboCAD
TurboCAD is an award-winning CAD software program for full-scale product design and drafting that runs on Microsoft Windows and Macintosh operating systems. The product is used by architectural and engineering firms worldwide for designing and rendering complex structures and products, such as buildings, bridges, automobiles, and even bridges and monuments.
5. OnShape
OnShape is a simple, computer-aided 3D design tool, delivered over the Internet through a Software as a Service (SaaS) model. This cutting-edge creation tool will make it possible for small and medium-sized companies to create high-quality design drawings from their computer desktops.
OnShape has a number of advantages over traditional drafting tools and software. The tools are easy-to-use and the company guarantees that the end product will meet or exceed the expectations of the customer.
What is The Difference Between Laser Etching And Engraving?
If you are relatively new to laser technology, you are probably wondering what’s the difference between laser engraving and laser etching. And more importantly, which one is right for you.
The main difference between laser etching and laser engraving is that etching melts the micro surface to create raised marks, whereas engraving removes material to create deep marks. Both processes use high heat to create permanent markings on metal surfaces.
Both processes are heavily used for part traceability. Let’s dive into each process to see which is best for which application.
The Laser Etching Process
When etching is performed, the laser heats and distorts the micro surface of the material. By doing so, the laser etched surface expands and creates a texture.
Laser etching creates black and white marks and is the most efficient process to permanently mark most types of materials. Etching is faster than engraving because it requires less energy from the laser beam.
You may need laser etching if:
- Your part is made of any metal, except stainless steel
- You want the fastest laser process
- You want a cost-effective laser that requires less laser power
- You need to integrate laser marking before non-abrasive treatments, including powder coating, e-coating, and heat treating
The Laser Engraving Process
Through the engraving method, the laser vaporizes a thin layer of the material to create a tracking code. This is done by sending a highly localized laser pulse onto your part.
Instead of creating a micro-surface that is raised above the material, laser engraving digs into the material. The engraving depth can reach up to 500 microns.
You may need laser engraving if:
- Your part is made of steel or aluminum
- You want marks with maximum durability
- You need to integrate laser marking before abrasive treatments, including shotblasting and sandblasting.
How Much Does Laser Engraving Cost?
Laser engraving itself is a relatively inexpensive procedure for what it achieves. Almost all other engraving techniques would cost more than CNC laser engraving for the same detail, accuracy and precision.
A much bigger contributor to the total cost of laser engraving services are the shipping fees that would usually be involved in sending and receiving one’s article for engraving.
Engrave Your Gift
Pricing: $6 to $200 and above (discounts available on demand).
Services offered: Laser engraving, laser etching, deep engraving, other CNC machining services.
Materials covered: Trophy Plaques, fashion jewelry, silver and other metals, rings, precious metals, industrial parts, custom parts and others.
Notable for: Diverse and high-quality range of services available
Standard Turnaround time: 1 week
Things Remembered
Pricing: $10 for first word/symbol and above (usually $3 per addition)
Services offered: Laser engraving, personalized embroidery
Materials covered: Various items of small personal nature.
Notable for: Free engraving services on clearance sales, in-depth personalization guide with logos, fonts, designs etc. to choose from. Multiple branches in North America
Standard Turnaround time: Up to 1 week
LASER-CUTZ
Pricing: $220 per hour for small CO2 or Fiber Laser Jobs, minimum charge $250 for small runs.
Services offered: Laser engraving, laser cutting, CNC, FDM Printing, Rapid Prototyping.
Materials covered: All materials that can be used with CO2 or Fiber Laser engraving
Notable for: Time-based billing suitable for bulk projects, flat rates also offered on negotiation basis.
Standard Turnaround time: 2-5 days (first in first out basis for job scheduling)
Ponoko
Pricing: $1 and upward per piece for bulk, $18 and up for single items
Services offered: Laser engraving and Laser Cutting
Materials covered: All materials available on their website, over 99 of them.
Notable for: End-to-end instant online quotation as well as product design assistance. Transparent pricing. Remake Guarantee.
Standard Turnaround time: 1 week
Hill Country Trophy
Pricing: $8 to $25 set-up cost, 0.45 Cents per letter engraved
Services offered: Laser engraving, rotary and stencil engraving also available.
Materials covered: Metals, plastics, glass, acrylic and others.
Notable for: Specializes in Trophies, cups and other “recognition” assortments. Economical rates.
Standard Turnaround time: Not provided, contact for more information.
Brainstorm Kingston
Pricing: $75 per hour
Services offered: Laser engraving, Laser Cutting
Materials covered: Plastics, glass, acrylic and others.
Notable for: DIYers welcome to operate the laser, references / demonstrable knowledge of laser operation required.
Standard Turnaround time: Dependent on project.
Types of Laser Engraving Lasers
While there are many different ways to classify laser engravers based upon their design, function or specialty, arguably the one factor affecting the cost of laser engraving is the type of laser used.
Co2-based lasers
Laser engravers with CO2 based gas lasers tend to be highly efficient with consistently intense laser beams. This in addition to their economical nature makes them the most popular type of Laser engravers available.
CO2 laser engravers are most suited for engraving non-metallic materials such as plastics, foils, stone, acrylics and organic materials like wood, paper, textiles, leather, and other similar materials.
Fiber lasers
Laser engravers with fiber based solid state lasers are known for their extreme precision and accuracy.
While being more expensive than CO2 lasers, fiber lasers offer up to 100 times the intensity and hence, accuracy and precision as compared to their CO2 counterparts for the same wattage.
Additionally, due to their solid-state, fiber lasers are maintenance free and last the longest number of service hours before needing eventual replacement.
Fiber based lasers are most suited for metal engravings of all kinds as well as for durable hard plastics.
Crystal lasers
Crystal lasers are also solid-state lasers with precision comparable to fiber lasers. The key differentiating factor for crystal lasers over fiber is their accuracy.
Crystal based lasers use ‘pump diodes’ that need to be replaced once they wear down and this makes these lasers the pricier of options to use for one’s laser engraving needs.
But if fiber-based lasers just aren’t cutting (or engraving) it for your project in terms of accuracy, these crystal lasers have a good shot of meeting those lofty needs.
Similar to fiber lasers, crystal lasers are also best suited for metals and hard plastics, with the addition of some ceramics (provided their surface allows for high intensity engraving).
How Much Does an Laser Engraving Machine?
Laser engraving machines can be bought these days foras little as $70 for something out of China, like the NEJE DK-8-KZ with its wood and leather engraving 1-Watt CO2 laser.
Basic cylindrical laser engravers similarly can be bought for as little as $200. However, a machine like this is much more a novelty gadget than a serious engraving tool.
CO2 based consumer laser engraving machines in the 40W plus laser strength range such as Mophorn 40 W Laser Engraver would set one back around $350 to $400.
Similarly, a CO2 based 100-Watt laser engraving machine at a minimum would cost around $1,000.
Whereas professional grade laser engravers go in the range of $2,000 up to $6,000 and above for CO2 and Fiber laser options. Diode-based lasers produce much better and repeatably accurate results however the premium in price is also something to consider.
What Equipment do I Need to Start a Laser Engraving Business?
Buying the right machine, allows you to engrave the materials you want, the way you want.
As a general rule, the bigger the allowance for work surface, the better the options you have to create pieces with varied dimensions and for many applications.
A good equipment allows you more room to scale, do mass production, and outpace your competitors. As your confidence and your experience with different designs increase, so will your orders.
Machines with 12 x 24 inch or 12 x 18 inch beds are considered standard and could be great first choices as you dip into the industry.
Laser marking is currently possible with five types of marking technologies depending on the types of materials you want to work on. There is Fiber laser, green laser, UV laser, CO2 and Mopa laser solutions for different applications.
How Can I Start a Laser Engraving Business?
If you are convinced that you have a viable business idea, let us look at what you must do to get your business to life.
By now, you have studied the market and you know that there is money to be made.
You have researched the equipment you could use, and its costs.
You understand the legal environment you will operate in, and all the other initial costs you need to consider.
Let us now look at the steps to starting your laser business:
STEP 1: Establish your business plan
Having a clear plan is essential for your ultimate success as an investor. Some of the things you will be doing at the planning stage are as follows:
Business Context: Creating a company vision and mission that will translate into measurable and achievable goals, be they in terms of sales volumes, customer satisfaction or geographical reach.
Capital Costs: Estimating, through objective research and analysis, what your initial and running costs are going to be.
Product and Market: Establishing and profiling your target market, their preferences, pains and the opportunities they present, and your offerings to address them. For example, if you are targeting schools, what are the pain they have with, for example, school badges, trophies, attire and kit tagging etc.?
Budget and Cash Flow: Financing and cash flows are also an integral part of the planning stage. You need to accurately map your capital expenses, your running costs, your inflows and your statutory obligations. This allows you to estimate the initial capital and when you expect to break even.
Brand Identity: The name of your business, your business brand, your team (even if your team is just you!)
At this point, you may want to check whether your chosen brand name is available as a web name, and probably buying the domain to secure it for your future website.Top of Form
STEP 2. Form a legal entity
If everything checks out, then establish a legal business entity.
A limited liability company is a great option for many countries. LLCs remove the possibility of you being personally liable if your business has problems.
You can hire a legal consultant cheaply to ensure your privacy is protected as your business remains legally compliant.
However, it is still possible to start a small business on sole proprietorship in most countries, as you seek to establish a foot print, get your first few customers through the door, and then probably establish better structures as you go.
STEP 3. Become tax compliant
Your legal agent should be able to guide you on the legal requirements for paying tax, including the frequency, how to keep your books, how to submit tax payments and returns and the documents you need to prove your tax compliance.
Get the taxman off your back before you make your first piece because illegal operation will spell a death knell to your business before you can realize any profits.
STEP 4. Separate your Finances from the Business
Keep books of accounts. Separate your personal accounts you’re your business.
The business is supposed to have its own financial identity and independence from you, whether you are a sole proprietor or not.
Recording your expenses and inflows because it is critical to understanding the financial flow of your business.
STEP 5. Embrace Regulatory Compliance
Understand the licenses and other permits you need for your business to be allowed to operate.
If you need environmental audits in your country to open such a business, then obtain them.
You don’t want to incur hefty fines and possible closures because you ignored some licenses of compliance documents for you to operate.
STEP 6: Access suitable Insurance options.
You are buying laser machines, setting up facilities and basically starting a business that could have risks that you need to insure. Research and access relevant and suitable insurance options, and build the insurance remittances into your business running costs.
This will allow you to mitigate calamities, protect major investments and allow you to expand your business without having to worry about the risks you insure against.
STEP 7. Brand your business.
As we have stated, your brand can spell success or doom to your laser marking and engraving. Define the signature for your art and how you will put it out there.
Create your business philosophy and stick to it. Some customers will buy from you because you have a vision, values and goals much easier than if you don’t.
STEP 8. Hit the Web… Hard
A business website is almost a must have in this day and age. Without it, you will not get organic traffic. People you don’t know, searching for what you offer and getting your product offerings from search engines like Google.
Create a blog for your product, your business story and your products. Write fantastic product reviews. Optimize your content for search engines to ensure that proper keywords relevant to your business are part of your metadata on your website.
Carry out proper site analytics to ensure that you have adequate and optimized web presence.
STEP 9. Do traditional marketing
The personalized item business is largely a localized endeavor. If you are aware of local social events, especially those organized by your target customers or entities that will attract your prospects, participate whole-heartedly, even if you don’t expect to make any sales.
So, for example, if a school festival is in the offing and you reckon you have an offering you need many school heads to learn about, make your samples, prepare your pitches, apply for exhibition, get your merchandise, and go to that fair prepared to net a few orders.
What is The Best Laser Engraving Machine?
Laser engravers/cutters use subtractive manufacturing technology (contrary to 3D printing, a.k.a. additive manufacturing). Their laser burns or melts material away in a selective manner, following specific instructions.
With a laser cutter and engraver, you can add a personal touch to almost any item or make your own customized objects. There are tons of laser cutters and engravers on the market though, and it can be quite challenging to choose the best laser engraver/cutter for your needs.
Our roundup features entry-level home laser engravers and desktop laser cutters and professional laser cutters/engravers to cater to all types of users.
1. Orion Motor Tech 40W CO2 Laser Engraving Cutting Machine

Orion Motor Tech 40W CO2 Laser Engraving Cutting Machine is an excellent workstation and one that directly competes with every other Orion laser cutter on this list. That is because outside of the design, it has some intuitive features for those who want to start laser engraving.
The Orion Motor Tech 40W CO2 Laser Engraver Cutter weighs 50 pounds and a control panel with adjustable knobs. The 4 detachable wheels enable you to move it around easily. The model works with most 3rd party vector graphic software programs, such as CorelLaser & LaserDraw. It also works with printers, scanning machines, and with documents in TIF, BMP, JPG, JPEG, WMF, EMF, and PLT formats. Unfortunately, it isn’t compatible with Mac OS systems.
It has an integrated exhaust fan to improve ventilation performance when working. Once it you turn it on, the red dot guidance will indicate the machine’s path. It has a 12 by 8 inch (300 x 200mm) engraving surface which is enough for all your engraving projects.
With this model, you can engrave or cut wood, bamboo, acrylic, mylar, pressboard, rubber, fabric, glass, ceramic, paper, fiberglass, leather, marble, melamine, anodized Aluminum, tile, cork, and more NON-metal materials.
Some of the features on the Orion Motor Tech 40W CO2 Laser Engraver Cutter to consider include:
- Able to engrave into dozens of materials except for metals
- Comes with a water pump, ventilation tube, exhaust tube, USB key
- 50-pound weight
- 12 by 8 inch engraving surface
2. FoxAlien LE-4040 Desktop Laser Engraver

FoxAlien LE-4040 Desktop Laser Engraver is the perfect device for home use. The model is an excellent tool if you need to cut wood, MDF, acrylic, cardboard, vinyl, leather, even pleated and powder-coated metal while on maximum speed (although it won’t cut it as nicely as wood).
It has an engraving area of 15.75 by 15.74 inches (40 x 40 mm), a maximum engraving speed of 3000 mm per second, and an accuracy of 0.1 mm. The cutter supports Windows XP, Windows 7, Windows 8, Windows 10, and Mac OS.
This laser engraver doesn’t have a fan and it won’t extract fumes and smoke, so you need to keep it in a ventilated area when working. You can connect it to your computer via a USB port from where you can manage it. Moreover, it is compatible with any kind of GRBL software LaserGRBL, Candle, or Lightburn.
The strong and precise laser cutter and engraving machine comes with one 5000mW module, power supply, three hex wrench, one USB cable, one U Disk one goggles, a user manual and with a pack of screws. It is extremely lightweight so you can use it on the table in your workshop.
The main components of this machine come pre-assembled, but you’ll need around 10 minutes to assemble the engraver. This one might be on the cheap side but it’s not a laser cutter for beginners since it hasn’t got any safety features and needs a little adjustment before you start engraving.
Features of FoxAlien LE4040 Desktop Laser Engraver
- Works on macOS and Windows
- 25.2 by 22.83 by 9.06 inches
- Cuts and engraves multiple materials
- Weighs only 10.68 pounds
- Pre-assembled
- Comes with a pair of goggles
3. BIBO 3D Printer and Laser Engraver

BIBO 3D Printer and Laser Engraver is a 3D printer that doubles as an engraving machine. So, for those who need to 3D print and engrave different materials, this is your go-to machine. Here, we will focus on the engraving aspect of it. The Bibo can cut through wood, double-color planks, leather, crystal, organic plastic, fabrics but it is also suitable for seal engraving, garments, or toys.
It has a printing/engraving area of 214 x 186 mm (8.4 x 7.3 inches). The engraving cutting precision of 3D Printer and Laser Engraver positioning accuracy is 0.01 mm (0.0004 inches.)
The printing layer resolution is 0.05-0.3mm, which is impressive for such a device. It’s compatible with Windows, Mac, and Linux OS and with STL, OBJ, DAE, AMF, BMP, JPG, JPEG, PNG, and GCODE file formats.
It is one of the cheaper laser cutters and engravers, but it is equipped with a superior laser head and has effective heat dissipation with two cooling fans.
Some of the features of BIBO 3D Printer and Laser Engraver:
- 3D printer and an engraving machine
- Works on Windows, Mac, and Linux OS
- 21.34 by 19.92 by 17.09 inches
- Engraves multiple materials
- Two cooling fans
4. Ten-HIGH 3020 40W Version
The Ten-HIGH 3020 is the upgraded variation of the previous covered Ten-High engraver. It gives you far more workspace, so if you need to work on a larger scale you can. With this engraver, you can work on a 12 inch by 8-inch surface area.
The Ten-HIGH 3020 is an extremely accurate engraver, with accuracy reaching 0.01mm. Additionally, at top speed, the Ten-HIGH 3020 can engrave at up to 600mm per second.
To help prevent the build-up of vapors given off while engraving plastics and other materials, there are double exhaust fans built into the Ten-HIGH 3020. It also connects to your Windows computer system via a USB interface.
As is the case with the other Ten-HIGH release, the Ten-HIGH 3020 is compatible with CorelDraw (not included), yet can only be used on a Windows computer.
Some features on the Ten-HIGH 3020 to consider include:
- Dual exhaust fans
- Engraving space of 12 inches by 8 inches
- Windows compatible
- Works with CorelDraw
- Extremely accurate at 0.01mm
- Engraving speed up to 600mm per second
5. TEN-HIGH CO2 Engrave Machine
The previous Bobs laser cutters are designed almost specifically for wood cutting. If you’re not looking for a wood cutter and want something capable of engraving an assortment of other materials the TEN-HIGH CO2 Engrave Machine is one option to consider.
It does work with a wide number of materials, including wood, leather, glass, cloth, bamboo, paper, and just about everything short of metal.
With the purchase of the TEN-HIGH CO2 Engrave Machine, you do receiver a specially designed software called LaserDraw. It is also compatible with CorelDraw, although CorelDraw is not included with the product.
The TEN-HIGH CO2 Engrave Machine software is compatible with all Windows operating systems, although it will not work with macOS computers.
The TEN-HIGH CO2 Engrave Machine will connect to a computer via a USB interface. It is not wireless, so you will need to have a nearby system.
Some of the features on the TEN-HIGH CO2 Engrave Machine to consider include:
- Capable of engraving a wide range of materials, including leather, wood, bamboo, paper, glass, and dozens of other options
- Total weight is 115 pounds
- Product dimensions are 34.5 inches by 25.7 inches by 20.5 inches
- Engraving area is 400mm by 300mm
- Compatible with CorelDraw (not included)
- Works on Windows 7, 8, and 10
- USB connection
How do You Convert Photos to Laser Engraving?
Based on our own process of trial and error, we’ve come up with the ideal step-by-step process for preparing your chosen image for laser engraving. With so many different types of laser engravers available, and many software options for preparing images, it’s difficult to generalize a method that’s consistently applicable.
Whether you’re an experienced designer working in CorelDRAW, or you’re using the free online tool GIMP, follow these steps to get your image ready for engraving.
Step One – Start with a High-Quality Image
When choosing an image to laser engrave, it’s important to start off with a high-resolution, high-quality image. A postage-stamp picture that you scanned out of an old photo album will not maintain its clarity through the transformations that need to happen before the image is ready to engrave, and you won’t be able to “inflate” or “blow-up” the picture like in the CSI television show. Make sure you take a high-resolution picture with a good camera to get the best results.
Step Two – Crop to Perfection
The advantage of starting with a high-quality photo is that you’ll be able to crop it effectively with making it look awful. Cut out the parts of the image that you don’t need and resize what’s left to the dimensions that you want it to appear on the stainless steel or other material you’re using.
Step Three – Remove the Background
This step is important and may require use of the cutting tool in your image processing software, or some handy Photoshop skills. If you don’t remove the background, your image could get lost in the background during the engraving process.
By making the background of the image plain white, the laser machine only engraves the focal object and you avoid obscuring the object with irrelevant background details that you don’t want.
Step Four – Convert the Image to Grayscale
Laser engraving produces grayscale images naturally by cutting different lines at different depths for different numbers of passes. Producing your image in grayscale gives you a good idea of what it will look like once it’s been engraved onto the material of choice – your image is almost ready! Looking at the image in grayscale should help you with the next steps, where you’ll have to do some light editing to the image for optimal results.
Step Five – Edit Your Photo However You Choose
Now that we’re looking at something similar to what the laser engraver will produce, we can start making any editions that are important for achieving the desired outcome. Editing photos is a highly subjective process, but we’ll provide a few pointers. These can be applied to photos of people, places, or objects.
- You want to try and maximize the contrast in key areas of the photo. This typically means making the whites whiter and the dark areas darker.
- Areas that appear white in real life, like the eyes or fingernails, should be highlighted in the image by reducing any shadows that appear there. Set the Black to 3-6% to help these areas stand out better.
- Remove shadows on any faces in the image because the darkness contrasts too heavily with hair, which is usually much darker. Set the Black to 10-15% for optimal results.
- For dark hair strands, darken them even more. For light hair strands, you can make them a bit lighter.
Step Five Alternative – Color Indexing
If you’re not about to get into editing your photo, there’s an option you can choose to help maximize the contrast without having to do any complex changes on your own – that tool is color indexing. If you plan to use color indexing, you may want to do it before you change the image to grayscale.
Color indexing is a tool that some imaging software has which can re-draw your photo with a fixed number of colors for maximum contrast. It essentially looks at all of the colors in the image, groups them together into as many groups as you choose, and replaces each group of colors with a single color. All you need to do is choose how many colors you want for the image and let your image processor do the rest.
Step Six – Sharpen Your Image
Sharpening just makes lines look bolder, and it’s a simple tool that’s present in virtually all photo editing programs. For photographs of people, sharpen areas like the eyelashes, lips, hair around the face, and anywhere else that you would like to emphasize in the final engraved image.
If you’ve photographed an object or a building, focus on the most important lines that add texture to the image and make it feel three dimensional.
Step Seven – Convert and Export
Now your image should look just the way you want it engraved on your stainless steel, plywood, or other material. The next step is to convert that image to a bitmap of appropriate resolution and end it to the laser CAD software so it can be engraved.
When exporting to bitmap, a recommended resolution is around 200 pixels per centimeter. This ensures that your image will appear in high resolution on the material you’ve chosen.
Step Eight – Push the Red Button
The last and most fun step is always setting up the options on the laser cutter and finally pressing “go” after you’ve done all the hard work. Engraving is different from laser etching in that it makes deeper cuts in the material, and it’s usually better to program the laser for multiple passes over the material, rather than trying to blast out big chunks of steel or wood in a single pass.
A galvanometer lasers use a system of oscillating mirrors to make cuts at extremely high speeds, so your project will be done in just minutes.
How Much Should I Charge For Laser Engraving?
Start by determining the cost of making your product. To do this, you will need to take all your variable costs and add them to the fixed costs. Secondly, research what customers are willing to pay vis-à-vis what your competitors are charging.
Last but not least, calculate your profit margins and settle on a price that makes you a good profit but is still not too far from what your competition is charging.
Knowing your costs is important because this is the only way of knowing if you are really getting a profit. This is usually easier for people who buy and resale finished products. But since you will be making laser engraved products from scratch, you must factor in the costs of your raw materials. If you bought your raw materials in bulk, try to calculate the unit cost for each. For instance, if your raw material costs $120 per piece, divide that by the number of items you will make from that raw material and you will have a unit cost.
Then go to an often-overlooked factor – the time you invested in making a product. This is usually a hard nut to crack but it is still important to consider it. Ask yourself this – what is an agreeable hourly rate to make from my business? Once you have a figure in mind, divide it by the number of products you make per hour and that will give you the cost of time spent on a product. Valuation of time invested in a product is a tricky affair so it is best to set it as a variable cost.
Make sure to list down and compute all other hidden costs. Here is an example of the kind of list you should make:
- Cost of material – $4.10
- Production time – $2.54
- Packaging – $ 1.98
- Advertising – $2.25
- Total cost – $10.87
In our example, it will cost you $10.87 to make one engraved product. It’s important to calculate the cost per unit because that will give you a better idea of how much to charge for the laser engraved item.
Is There Money to be Made in Laser Engraving?
Products that include a personal dedication are gaining in popularity. The field of application is very wide. The offer for end customers is as varied as the materials. Whether you’re talking about picture frames, wine glasses, gifts or ballpoint pens – a personal dedication with names, text, logos or photos make these types of items very unique.
But personalized signs, stamps, medals and trophies, data plates or various types of contract engraving of components can also be a lucrative business for companies, both as individual pieces or in mass production.
A variety of materials can be processed with a laser and thus many customer requests can be realized. To begin with, a wide range of laser-engraved products is certainly a great way to find out which items appeal to the market and which products can be used to earn good money.
Whether a specialization in certain products and materials takes place over time or a deliberately broad portfolio is offered, is a strategic decision for every company. This decision is significantly influenced by the competitive situation in the region in which you operate: Are you the sole provider of laser services? Or is there already a specialist? For example, are glass engraving or wedding decorations sold around the corner?
As an entrepreneur, you should carefully consider your business model and weigh the advantages and disadvantages for yourself.
In terms of specialization, the workload and output can be optimized as best as possible, as the applications are always similar and you develop into a true specialist. Thus, set-up times are minimized and profit maximized.
From a broad product portfolio through to individual customer projects and individual pieces, however, although you’re not a specialist in a certain area, customers for custom-made items are willing to pay more, which in turn leads to higher margins.
10 Product Ideas To Make Money With A Laser Engraver
Below are ten awesome product ideas to get you started as a laser engraver, but you can always add to your product line as you progress.
1. Engraved Tumblers And Mugs
Personalized tumblers and mugs make excellent gifts for birthdays and other special occasions.
Therefore, you might want to stock a range of glassware and mugs that you engrave with a personalized message upon order.
In addition to that, you could also pre-engrave some items with generic messages like ‘Happy Birthday!’
If you do this, just be aware of your stock levels, as you don’t want to carry too much inventory at one time.
2. Leather Wallets
Leather wallets that are engraved with a loved one’s initials or something similar are super popular.
A personalized leather wallet is a gift for all occasions and can be customized in a variety of ways.
Make sure you stock a couple of different leathers and perhaps even a number of styles and designs.
Everyone has their preference when it comes to wallets, and you will quickly learn which is the most popular.
3. Plaques/Signage
There’s a good chance you will get some work for commercial clients if you engrave plaques and signage. If you think about how many signs are utilized in businesses all over the world, you have so many opportunities for work.
If you deliver high-quality, industry-standard signage to businesses, you can receive lucrative, ongoing contracts that can bolster your bottom line.
4. Leather Camera Straps
For people who take their photography seriously, laser engraved leather camera straps would make for an awesome gift.
As with leather wallets, consider the fact that people like different styles and types of leather when it comes to straps.
Again, you could offer a small selection of styles and designs in the early days, and when you learn which is the most popular, you could limit your range and focus on what sells well.
5. Watch Bands
If you want to make money with a laser engraver, customized watch bands are another great product idea.
You might consider offering a chain-link band and a leather band, so your customers have a decent choice.
Just be sure to offer a couple of options and check on standardized sizes before buying your stock.
Having options for both men and women expands your potential customer base, too.
6. Cutting Boards
Personalized cutting boards are an excellent way of creating a memento of a special day.
For instance, your clients might order them for their wedding or as a special anniversary gift for a loved one.
You could offer a range of finishes and sizes, depending on the materials that you use.
To make your cutting boards extra special, you could offer unique patterns and designs to accompany the words that you engrave.
This will help you stand out from your competitors.
7. Ornaments
Although maybe not as popular as they once were, ornaments are still a great gift idea, especially at Christmas.
You might consider offering a themed range of ornaments, depending on your target customer base.
Ornaments come in all sorts of shapes and sizes, so consider stocking a nice range of options for sale on your website.
8. Awards/Trophies
As a laser engraver, you should be able to secure a lot of business personalizing awards and trophies.
If you think of the sheer number of schools, community groups, and sports teams that dish out awards, you will begin to see the potential in this idea!
Some people will hire you to engrave a trophy or award that they already own, so this is an additional service you could consider offering for an extra fee.
9. Picture Frames
People love giving engrave picture frames as a gift. They’re common as wedding presents, but also for families and friends who want to commemorate a special event or family vacation.
Again, like many of the products introduced here, there are lots of different styles and materials you can use for personalized picture frames, so offering a range of options for your clients is a nice touch.
10. Promotional Items (A.K.A. Schwag)
Many businesses hand out promotional items to their clients to increase their brand awareness. Perhaps they’re being represented at a jobs fair or presenting at a certain function and want to take some schwag along with them.
Items like dog tags, pens, and flasks are great promotion item ideas for laser engravers, and the more options you can offer your business clients, the more likely they are to place an order.
What Type of Wood is Best For Laser Engraving?
Wood is one of the popular materials for laser engraving projects. It exudes a natural feel that fits perfectly with timeless uses and applications. However, the type of wood you use has a huge impact on the outcome of your project.
There are a number of wood types that tick all the boxes when it comes to laser engraving. However, if you are starting out, we suggest using any of the wood from this list:
- Alder
As a softwood, alder has a supple texture and minimal streaking. It also features a nice light color that produces a pleasant dark burn. It has a few knots but these won’t affect the clarity of your engravings one bit.
- Cherry
Cherry is popular for making cabinets and furniture across the planet. It also works well for laser engraving as it has low resin content. It has a light color and creates breathtaking engravings despite having high levels of streaking.
- Maple
like cherry and alder, maple features a light color and burns dark for the most part. It has light streaking that makes it an excellent material for photo laser engraving.
What is Fiber Laser Engraving?
The first thing you must know is that there is no such thing as a “fiber laser engraver”. You may need a fiber laser to engrave metals, but the laser you’re looking for could also be configured for laser cleaning as well as various laser marking applications.
Each type of fiber laser is the combination of a laser source, laser beam output, lens configuration and laser parameters. For that reason, there is a wide variety of fiber lasers that offer different benefits. Choosing the right technology is key to get optimal results.
The Laser Source
The laser source includes an optical fiber which can be doped with different rare-earth elements to generate specific wavelengths. By knowing the laser source and its wavelength, you can quickly know if a fiber laser is right for your application. Let’s look at common examples:
- Ytterbium-doped fiber lasers produce a wavelength of 1064 nm, which makes them ideal for the material processing of metals. These are the fiber lasers that Laserax uses for metal marking and cleaning applications.
- Thulium-doped fiber lasers produce a wavelength of 1940 nm and can be used for medical applications as well as for laser marking plastics.
- Erbium-doped fiber lasers produce a wavelength of 1550 nm and are mainly used in telecommunications. They provide us with high-speed internet and voice over IP but are not used for laser engraving.
The use of fiber lasers is widespread due to the various wavelengths they can generate. The first step should be to look up the laser source to see its potential applications. This could prevent you from buying a laser that cannot engrave your material. For example, if you need to mark plastics and other organic materials, you may need a CO2 laser marker.
The Laser Beam Output
When buying a laser, you must look at whether the laser beam is pulsed or continuous. Some industrial laser marking systems can even switch from one mode to the other.
Let’s look at the types of beams more closely:
- Pulsed laser beams generate high energy peaks that are ideal to engrave permanent marks or pierce small holes without melting surrounding areas.
- Continuous-wave laser beams generate consistent energy levels that are perfect for laser welding, laser drilling and laser cutting machines.
Lens Configuration and Laser Parameters
Laser experts optimize the lens configuration and laser parameters for different materials and manufacturing processes. The lens configuration may include the focal length, scanning speed, spot size, marking distance, and so on. Laser parameters include the beam diameter, beam quality, pulse length, the number of passes and much more.
Laserax offers different optimized configurations for its ytterbium-doped fiber lasers depending on the metal that needs to be engraved. If you’re interested in knowing how laser parameters affect the laser process, you should read this post on laser ablation.
How Does Fiber Laser Technology Work?
Understanding laser technology can help you make a more informed decision when buying a laser. To explain how each component works, let’s go over the journey of a laser beam, starting in the laser diodes, going through optical fiber, then finally hitting the part to be engraved.
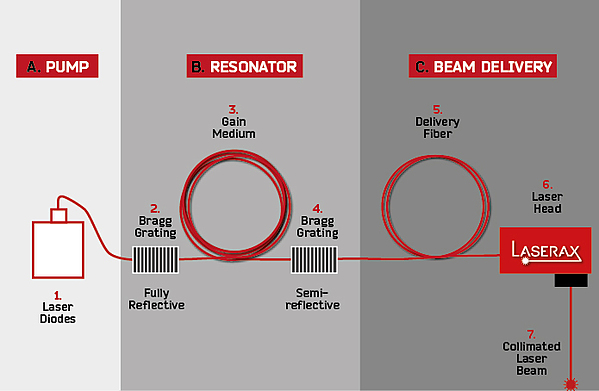
The Pump Module
The laser beam journey begins when the laser diodes emit light. Passing through the fiber optics, light travels to the gain medium, pumping it with photons which, in turn, excite the photons already in the gain medium. This generates an energy buildup.
The Resonator Module
When the photons enter the resonator module, they bounce back and forth between two Bragg gratings. A Bragg grating is a piece of fiber optics with lower-density stripes in it that control which wavelengths are reflected and which are not. It acts as a selective mirror.
One of the Bragg gratings is semi-reflective, meaning that only the photons of specific wavelengths go through. These photons form the laser beam. For our ytterbium-doped fiber lasers, only the photons with a wavelength of 1064 nm go through.
The Beam Delivery
Before the laser beam generates a permanent mark onto the part surface, it goes through a lens and, sometimes, a beam expander—both of which are located inside the laser head.
The lens focuses the laser beam onto a single location, allowing it to generate enough energy for engraving. The beam expander, on the other hand, expands the size of the laser beam (usually referred to as the spot size).
A larger beam tolerates part positioning variations better, preventing adjustments between two jobs. Because most fiber lasers have a low tolerance for part positioning variations, you should pay attention to this when choosing a fiber laser.
Fiber lasers direct the beam to a specific location on the part using mirrors. These mirrors are controlled using “galvanometer motors” (or galvos), a special type of motor that can move the laser beam very precisely and at a high speed. The beam ends its engraving journey when it leaves the laser head to hit the surface.
What is 3D Laser Engraving?
3D laser engraving is a process that creates 3D engravings of photos, designs, logos, etc. on varied materials. With 3D laser engraving, the laser is usually set to allow the dark areas of the material to receive maximum power while the lighter areas skip engraving altogether.
The shades in between receive varying power for the best 3D appearance. In addition, the laser machine adds sloped edges to the product at different depths. The result is a breathtaking 3D work of art.
Unlike traditional 2D marking, 3D laser engraving takes a bit of time but the results are certainly worth the effort. Essentially, your designs or photos are modeled into a 3D design via computer software.
Once your design is ready, the 3D laser machine will focus its concentrated beams of light on a specific point below the surface of the material. The process begins when each bright point in the design is plotted on the final material surface. The machine will then focus a beam on each 3D coordinate. As the beam arrives at the focal point, the high-power laser pulse makes a small inclusion or void in the material.
Once this is done, the laser will move to the next coordinate and repeats the same process to make a second etched point. It will do this repeatedly until a sufficient number of points have been created to reproduce the intended design within the material. The laser machine typically emits a high-power output for darker areas and automatically decreases the power when the image becomes lighter.
The higher the power output from the machine, the deeper the laser burn and the lower the power output, the shallower the burn and hence the less material will be burned. Depending on the material in question, you might need to clean the surface of the product after engraving to get rid of debris. This is especially true for wood as it tends to give off a lot of oil residue during the intense heat exposure.
Why is 3D Laser Engraving Necessary?
3D laser engraving comes with a host of benefits not only for individuals running a home-based laser engraving business but for big companies too. Here are some of the important advantages;
1. Flexibility
3D laser systems have the ability to produce clear engravings on non-flat surfaces. These include round shapes, cylindrical shapes, conical shapes, parts with concave/convex portions, triangular shapes, and sloped surfaces.
Additionally, a 3D laser machine can engrave objects at different heights. This is because it can easily adjust the laser beam position and the laser focal length, a task that is impossible with a 2D laser.
2. Better marking effect
A 3D laser engraver has a larger working area (can have a lens of 500*500, 600*600, etc.) compared to a 2D engraver (300*300 lens). It also employs a front focusing optical mode that makes use of a larger X, Y-axis that offers a good deflection of the lens. These are beneficial in increasing the integrity of the marking effect and better focus accuracy.
3. Ideal for deep engraving:
With 2D engraving, deep surface carving is quite tricky. As the focus of the laser ascends during the process of engraving, there will be a sharp drop in the laser energy of the actual surface of the object. This has a direct effect on the efficiency of engraving. On the flip side, 3D engraving is devoid of this challenge and is more suitable for deep engraving.
4. Allows for multi-color engraving
when aiming for multi-color engravings, using 2D machines is possible but it can be quite limiting. 3D machines, on the other hand, can perform plane processing of multi-color effects.
5. Better personalization
there’s no denying the fact that 3D engraved laser items are highly personalized. The technology provides exacting accuracy that brings an otherwise 2D image to life uniquely and beautifully. With 3D laser engraving, you can let your mind run wild as you bring otherwise bland designs and photos of varying sizes to life thereby creating a perfect 3D gift.
6. Quality marking
3D engraving offers high-quality marks with clean mark edges. Laser beams are non-invasive meaning your products will have no marks or blemishes.
How Does Color Laser Engraving Work?
Color laser engraving is a laser engraving technology that adds color to engraved objects. This is usually achieved by heating the surface of the material to form an oxide layer after which visible light can be reflected on it. This light is what creates the appearance of color. In some cases, a color dye powder is spread over the object then melted into the engraving using an engraving machine.
Read Also: 10 Inspiring Designs to Jump Start your T-shirt Printing Business
You can color engrave a variety of materials including plastics, rubber, coating materials, electroplating materials, engineering plastics, ABS, Pes, PVC, and epoxy resin, acrylics and metals (steel, titanium, transition metals, and chrome plates).
The principle behind laser color engraving is surface oxidation. Scientifically, many material surfaces react in the air to form thin oxide layers. When the surface of a material is heated using a laser beam, it forms a thin oxide film.
The actual thickness of this film is achieved by altering the scanning velocity, power, and line spacing. Other essential parameters for the technology include marking direction, marking speed, focal spot diameter, pulse length, and repetition rate.
Once a constant material surface temperature has been maintained, a uniform color can be created. The thin oxide layer will grow in thickness until it forms a thin film effect. This is what determines the reflection of white light and hence the appearance of other colors.
A thick oxide layer is beneficial because it protects the material against corrosion and scratching. For acrylic, color laser engraving is achieved through the addition of a color dye powder. This begins with traditional engraving then pressing a special powder on the engraved parts using a laser machine.