Configuring port forwarding on your Sony PlayStation 5 requires you to first configure a static IP address. If you’re having trouble connecting to specific online services due to NAT issues, you may need to configure port forwarding on your router. Most internet service providers will assign you a publicly routable IP address that will allow you to port forward.
This post will demonstrate how to configure a static IP address from within your router. Most people will prefer this option, especially since you will need to log in to your router to configure port forwarding anyhow. This method will also ensure that you do not have IP address conflicts on your network, something many people either don’t understand or overlook.
Find Your Router’s IP Address
The first step to setting up a static IP address on PS5 is to locate the IP address of your router. The best way to find the IP address of your router is to find the default gateway on one of your devices. This could be a computer, tablet, or even your PS5. The default gateway is the IP address of your router. Once you find the IP address of your router, write it down for the next steps.
You may also find your router’s IP address on a sticker attached to the router, usually near the ethernet ports. If not, refer to your router’s user guide and you will not have a problem finding the IP address.
Log in to Your Router
You will want to complete the remaining steps on your computer, it can be either a PC or Mac. It will make the process much easier. If you do not have access to a computer, they can also be completed on a tablet or smartphone. Using a computer is highly recommended, given the small text on your router settings page.
Open your web browser. We use Chrome, but this process will also work in any modern web browser, including Safari, Edge, Firefox, etc. In the address bar, enter the gateway IP address you wrote down from the previous step and press enter.
Read Also: Will my PS4 Themes Work on PS5?
This will open your router’s login page. You may get a security warning because many routers use a self-signed SSL certificate. This is completely normal and not a cause for concern. Simply choose to proceed anyways. You may need to click advanced to expose this option if you use Chrome.
From here, you will reach the login page of your router. If you changed your login credentials when you set up your router, you will enter them here. If you did not change your login credentials, you will enter the default credentials for your router. Sometimes they are printed on the bottom of your router. If not, simply Google the brand of your router and look up the default login credentials.
Assign a Static IP Address to Your PS5
Once you enter your login credentials successfully, you will reach the admin dashboard of your router. From here, you will want to find your DHCP settings. On some routers, this will be listed under LAN settings. On others, it will be directly on the initial dashboard screen. Your router will likely look slightly different than mine, but most routers will have a DHCP settings page. Once you find your DHCP settings page, you will want to open it up.
Now that you have opened up your DHCP settings, you will want to find your PlayStation console in the list of connected devices. Depending on how many devices are connected to your router, this list may be short or long. If you are unsure which device is your PS5 console, you can look for the IPv4 address or MAC address that matches your console.
It is very important that we identify the correct device during this step. Once you find your console, you will want to set the IP address as static. This may be called different things depending on the brand of your router. It is usually either set IP as static, reserve this IP address, create DHCP reservation, or something similar. You will select this option to ensure that your PlayStation 5 console is always assigned the same IP address.
From here, your Sony PS5 has successfully been configured with a static IP address. There are no settings that need to be changed on the console itself when using this method, as the router assigns the static IP address to the console automatically.
It also assigns your DNS servers automatically. If you want to change your DNS servers on PS5, you can do that from within your router’s DNS options. We would recommend using this setup method for most people because it is simple and avoids the possibility of an IP conflict occurring on your home network and all associated problems.
IP conflicts occur when your router tries to assign an IP address to a device when another device is already using this IP address. The easiest way to avoid this is to let your router assign all your IP addresses. This will help to avoid having to manually keep track of anything, including IP address assignments.
Once these steps are completed, your PlayStation will now have a fixed IP address. This will allow you to forward ports as needed for PlayStation Network. If your NAT type is strict in games, port forwarding will help to expose the needed ports directly to the internet. Some games work fine without port forwarding, but others require it to get an open NAT type.
It is also important to note that when we talk about static IP addresses in this article, we are talking about configuring them on the private side of your network. Your internet connection from your ISP will still have a dynamic IP unless you subscribe to an internet plan that includes a static IP address. If your ISP uses CGNAT technology (most common with satellite and cellular internet service providers), you will not be able to forward ports effectively.
How to Forward Ports to a Playstation 5
If you’re trying to get NAT type 2 on your PS5 then the first step is going to be to set up a port forward. It can seem like an intimidating task to log in to your router and create a port forwarding entry, but don’t worry; we’ll walk you through it.
A port forward is a way for data to get into your home network through your router. Without setting up a port forward then all data connections must be created from the inside of your network, which is usually a good thing. However, when you are gaming, a lot of times you want people to be able to connect to your PS5. This is where a port forward comes into play.
One other thing… When you set up a port forward it is also best to set up a static IP address pointing at your PS5. Having a static IP address for your PS5 guarantees that your PS5 will get the same IP address every time you turn it on. Without a static IP address, your PS5 might get a different IP address every power cycle, which will break your port forward. The static IP address step is actually the harder step of the two, but sometimes it is worth doing because it means that your port forward will continue to work for a longer time.
Find PS5 IP Address
The first thing we need to do is find some IP addresses. We need to know both your PlayStation’s IP address and your router’s IP address. Fortunately, there’s an easy way to get both.
From the PlayStation menu, go to Settings and then scroll down to Network.
On the Network screen choose “View Connection Status”. This will show you both your PS5’s IP address and your Default Gateway address.
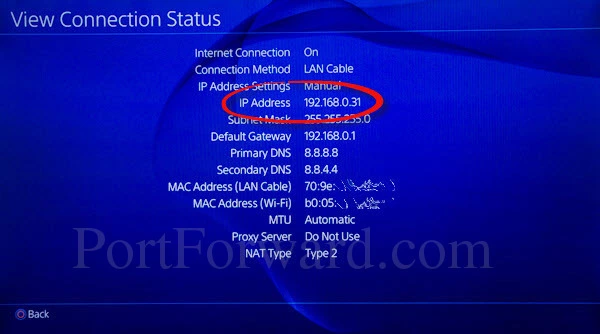
An IP address is a series of 4 numbers separated by a dot. It is very common for your PS5’s IP address to start with 192.168.0 or 192.168.1, followed by a final number. Another series of common IP addresses start with 10.0.0. and are also followed by a final number.
Write down both IP addresses because you are going to need them in the following steps.
Login To Your Router
Now we need to log in to your router. Open up a web browser and type the IP address into the address bar and press enter. You can use any web browser that you like: Chrome, Firefox, Edge, Opera, or Safari will all work. They all have an address bar where you can type in either website addresses or search terms. In the address bar (circled below) simply put the IP address of your router.
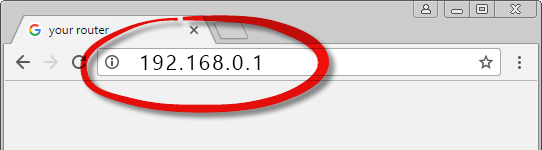
In the example above the router’s IP address is 192.168.0.1. Be sure to put your router’s IP address in the address bar.
This should take you to the router’s login screen.

You need to know your router’s username and password. If you’ve never set them, then it’s likely that they are the defaults. You can find a list of Default Passwords here. When in doubt you can always try admin password or blank or a combination of the two.
| Username | Password |
|---|---|
| admin | password |
| (leave blank) | admin |
| (leave blank) | password |
Try various combinations from the list above. If none of them work we have many more to choose. Go find your router manufacturer on our Routers List and then find your router. You should see a list of all known usernames and passwords.
Find the Port Forwarding Section
Once you’re logged into your router, you need to find the port forwarding section.
Sometimes it’s called Virtual Servers, sometimes it’s called Apps and Gaming, and sometimes it’s just called Port Forwarding. Sometimes it’s hidden under the firewall section, sometimes it’s hidden in the security section, and sometimes it’s in the LAN section. Look around a little and you should find it.
Here is what the Apps and Gaming section looks like in a typical Linksys router.
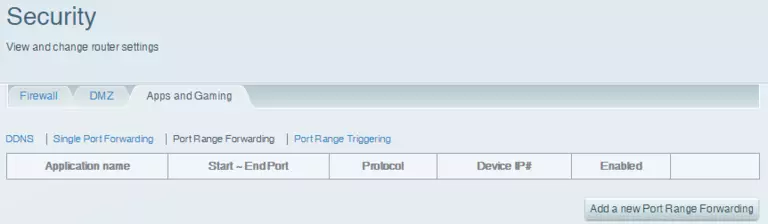
In this case, we’ve chosen Port Range Forwarding because it is the most flexible option in this router.
Create a Port Forward
A port forward is basically a setting that tells your router to take data that shows up on certain ports and send it to a certain device. In this case, the ports are the standard PlayStation Network ports and this device is your PlayStation.
Remember: A Port Forward takes data coming into your router from the internet and directs it at your PlayStation’s IP Address.
As you configure a forward in your router you may be asked about TCP or UDP. If your router has the option of Both then just use that as it’s simpler. For the PlayStation network on a router that supports both, here’s the list of ports to forward:
If your router supports Protocol Both:
    Protocol Both: 1935, 3074, 3478-3480
If you must forward TCP and UDP separately then create a forward for the TCP ports and create another forward for the UDP ports. For the PlayStation Network here are the required TCP and UDP ports:
If your router does not support Protocol Both:
    Protocol TCP: 1935, 3478-3480
    Protocol UDP: 3074, 3478-3479
Remember that you are creating this forward pointing at the IP address of your PlayStation device.
Here is an example of forwarding the PlayStation Network ports on a very common Linksys router.
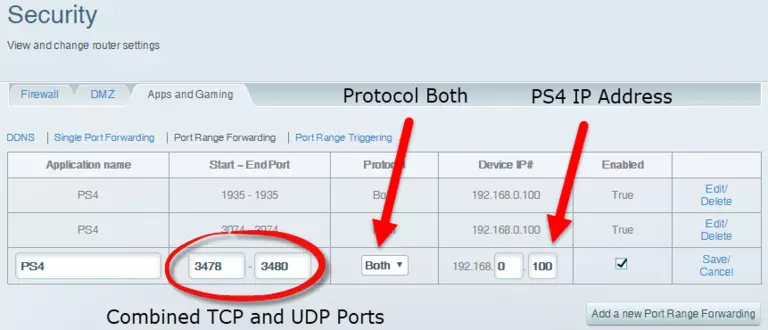
Since this router takes ranges of values, we’ve created 3 entries. Each entry has a range of values in it from the list above.
If this router did not support Protocol Both then we would have had to create 4 entries; 2 for TCP and 2 for UDP.
Network Utilities
If you follow all of these steps then you should have NAT type 2 on your PlayStation 5. If you just can’t get it to work you can always use our Network Utilities software which comes with support. Our support team is happy to help you get NAT type 2 on your PlayStation.
When you use Network Utilities to forward ports in your router it automatically creates the correct entries for you. It can also combine multiple entries to maximize the limited available space in your router.